The Future of IdentityServer
Tl:dr https://blog.duendesoftware.com/posts/20201001_helloduende/ Brock Allen and I have been working on the IdentityServer code-base for more than 10 years. In 2020 we will be making some important changes to it. Here’s why we are doing this. Our HistoryThe very first version of IdentityServer, which was called StarterSTS, was a collection of 7 aspx files with embedded […]
The Future of IdentityServer — leastprivilege.com
IdentityServer and Signing Key Rotation
When maintaining keys used for cryptographic operations (such as when running a token server that maintains keys used to sign tokens), a good security practice is to periodically rotate your keys. This is the process of retiring one key and onboarding another.
Within IdentityServer, the way you indicate your primary signing key is with the AddSigningCredential extension method we provide that adds IdentityServer to the ASP.NET dependency injection system. AddSigningCredential can accept an X509 certificate, the subject distinguished name or thumbprint of a X509 certificate stored in the windows certificate store, or just a plain old RSA key. The public portion of the key used for signing will be included in the discovery document.
We also provide an AddValidationKey extension method to allow additional keys to be included, such as those that are pre-active, or deactivated. In other words, the keys that you plan to use, or that were recently used for signing.
All of those calls might look like this in your ConfigureServices in Startup:
services.AddIdentityServer()
   .AddSigningCredential("CN=currentKeyName")
   .AddValidationKey("CN=lastKeyName")
   .AddValidationKey("CN=nextKeyName")
So, what’s the process for performing key rotation?
When you first deploy your IdentityServer, you will have your first signing key (let’s call it key1). You will run with this in production for some amount of time (say 90 days, or 9 months, or whatever you deem the acceptable duration your key should be in use). This is what the AddSigningCredential API is for.
You will then prepare key2 as the next key to be used, but you can’t switch immediately to using it. The reason is that normally OpenID Connect and/or OAuth2 consumers will cache your token server’s key material from the discovery document. If you were to immediately change keys, then new tokens signed with key2 would be delivered to consumers that have only key1 in their cache. What is needed is to introduce key2 into the discovery document prior to the switch over to using key2. This is what the AddValidationKey API is for.
Now in your discovery document you still have key1 as the active signing credential, and additionally key2 as a validation credential. You will leave this running for some amount of time (say 2-5 days or longer depending on cache durations) to allow consumers to update their caches from your updated discovery document. Then you can switch over and promote key2 to your active signing credential.
But what about key1? Well, you need to maintain it in the discovery document even though you won’t be using it anymore for signing. Why?
Let’s say that you just issued a token signed with key1, and then you switch keys (and drop key1 from your discovery document), and then at that exact moment a consumer reloads their cache. This would mean that the consumer would then only have key2 in their cache and would not be able find the correct key to validate the token signed with key1.
In short, when you retire a key, you need to keep it in discovery. This means when you retire a key you will just switch the two keys used in the calls to AddSigningCredential and AddValidationKey.
Then after some more amount of time (longer than the expiration of any issued token), you can finally remove key1 from discovery.
Given the above workflow, it’s possible that you could have two keys in discovery (if not three or more, depending on how narrow your window of rotation). Just as a means to validate my point, here is a screen shot of Azure Active Directory’s key materials from its discovery document. As you can see, there are three signing keys:

This also means there are three steps in a key rotation lifecycle. Depending on how your build and deploy your IdentityServer, this might be a manual (and potentially tedious) process. But in short, the primitives are in place for you to implement key rotation in IdentityServer.
HTH
Update:
Rock Solid Knowledge and I have teamed up to release a commercial component that performs key management and key rotation automatically. It can be found here. Enjoy!
Scope and claims design in IdentityServer
Very often I see developers that are confused about the relationship of scopes and claims in IdentityServer. Hopefully this blog post will help.
In OpenID Connect and OAuth 2.0 the definition of a scope is a resource that a client application is trying to get access to. This concept of a resource is deliberately vague and the confusion is exacerbated by the two different specs using the scope concept for two similar yet disparate uses. Also, designing scopes is up to the application developer which means you must impart semantics into your scopes, and this requires some amount of planning and/or design.
OpenID Connect and Identity Scopes
Given that OpenID Connect is all about an application authenticating a user, then the scope, as a resource, means that the application wants identity data about a user. For example, the user’s unique ID, name, email, employee ID, or something else along those lines. This scope is an identity resource and is an alias for some number of claims that the application requires about the user.
The OpenID Connect specification defines some scopes, for example openid which simply maps to the user’s unique ID (or sub claim), and profile which maps to about 10+ claims which include the user’s first name, last name, display name, website, location, etc. Custom identity scopes are allowed and the scope of the scope, so to speak, is defined by the application developer. So a custom scope called employee_info could be defined which could represent the employee ID, building number, and office number.
In IdentityServer, these identity scopes are modeled with the IdentityResource class. The constructor allows you to pass the name of the scope (e.g. employee_info) and a string array which is the list of claims that scope represents.
new IdentityResource("employee_info", new[] {
    "employee_id", "building_number", "office_number"})
The scopes (and corresponding claims) defined by the OpenID Connect specification are provided by the IdentityResources class and its nested classes such as OpenId, Profile, etc.
var identityResources = new[] {
    new IdentityResources.OpenId(),
    new IdentityResources.Profile(),
};
The nice aspect of this design is that the claims are only delivered to the application if needed as expressed by the scopes requested, and different applications can receive different claims by requesting different scopes.
OAuth 2.0 and API Scopes
Given that OAuth 2.0 is all about allowing a client application access to an API, then the scope is simply an abstract identifier for an API. A scope could be as coarse grained as “the calendar API” or “the document storage API”, or as fine grained as “read-only access to the calendar API” or “read-write access to the calendar API”. It’s possible that other semantics could be infused into your scope definitions as well. This scope is an API scope and models an application’s ability to use an API.
In IdentityServer, these API scopes are modeled with the ApiResource class. The constructor allows you to pass the name of the scope (e.g. calendar or documents).
var apiResources = new[] {
    new ApiResource("calendar"),
    new ApiResource("documents"),
};
The access token used to call these APIs will contain a minimal set of claims. Some of these claims are protocol claims (e.g. scope, issuer, expiration, etc), and there is one main user related claim which is the user’s unique ID (or sub claim). If other claims about the user are needed in one of the APIs, then the ApiResource constructor provides an additional constructor parameter as a string array which is the list of claims needed. This, in essence, allows the ApiResource class to model an API and the user claims needed by that API.
var apiResources = new[] {
    new ApiResource("calendar", new[] { "employee_id" }),
    new ApiResource("documents", new[] { "country" }),
};
The nice aspect of this design is that the claims are only present in the access token if the access token is meant to be used at those APIs.
Summary
We feel this is a nice balance for how to work with the abstract scope concepts in the OpenID Connect and OAuth 2.0 protocols, and at the same time allowing a concrete pattern for expressing what claims are needed by apps and APIs.
Hope this helps.
Using OAuth and OIDC with Blazor
I am sometimes asked what OIDC/OAuth2 protocol flow a Blazor application would use. Since a Blazor application is just a browser-based client-side application, then the answer is the same as if you were asking for a JavaScript browser-based client-side application (or SPA). And more specifically, I’d expect most Blazor applications to be some-domain. Here’s the updated guidance for that.
Recently Safari on iOS made changes to their same-site cookie implementation to be more stringent with lax mode (which is purportedly more in-line with the spec). In my testing, I noticed that using strict mode same-site cookies had the same behavior on both Chrome and FireFox running on Windows. This behavior affected ASP.NET Core’s handling of external authentication providers for any security protocol, including OpenID Connect, OAuth 2, google/facebook logins, etc. The solution was to unfortunately configure cookies to completely disable the same-site feature. Sad.
I was curious if we could really figure out what was happening and come up with a solution that allowed us to keep using same-site cookies for our application’s main authentication cookie. I think I have, and this solution could work with any server-side technology stack that works similarly to how ASP.NET Core does when processing authentication responses from external providers (cross-site).
Recap of what’s not working
Here’s a summary of the expected flow:

The step where the flow fails is on the last step, step4, where the user is not logged in. It turns out that’s not exactly what’s happening. Here are the details:
Step1: An anonymous user is in their browser on your application’s website. The user attempts to request a page that requires authorization, so a login request is created and the user is redirected to the authentication provider (which is cross-site).
Step2: The user is presented with a login page and they fill that in and submit. If the credentials are valid then the provider creates a token for the user, and this token needs to be delivered back to the client application. This delivery is performed by sending the token back into the browser and then having the browser deliver it to the application’s callback endpoint. This delivery could be via a redirect with a GET or a form submission via a POST. The problem with same-site cookies is not affected by the method of delivery back to the client application, so either of these triggers the issue.
The key point here is that, from the browser’s perspective, the user is starting a workflow from the login page in the provider’s domain. The response is then sending the user back to the client application (which is cross-site).
Step3: The client application will receive and validate the token, and then issue a local authentication cookie while redirecting the user back to the original page they requested.
This is the step that I think is easy to misunderstand. Because the request from the provider back to the app is cross-site, there is a belief that the issued cookie is ignored by the browser. It is not, though, and the browser will in fact maintain this cookie issued from your application.
Step4: The last redirect in the workflow sends the user back to the original page they requested. This is the step that fails from the end-user’s perspective. The cookie issued from step3 is not sent to the server, and so the user seems to not have been authenticated.
The reason this step fails is not because the cookie was not issued to the browser, but instead because the current redirect workflow started from the provider’s login page, which is cross-site so the browser refuses to send the cookie just issued in step3. If at this point the user were to refresh the page, or manually navigate their browser to the original page the browser would send the cookie and the user would be logged in. The reason is that a refresh or manual navigation is not a cross-site request.
The fix in general
The solution to this problem then is to change how the final redirect in step3 is performed. In ASP.NET Core it’s done with a 302 status code, but there’s another way. Instead the response in step3 could be a 200 OK and render this HTML:
<meta http-equiv='refresh'
      content='0;url=https://yourapp.com/path_to_original_page' />
This response in step3 in essence ends the cross-site redirect workflow from the browser’s perspective, and then asks the browser to make a new request from the client-side. The trick is that this request is a new workflow and considered same-site since it’s from a page on the application’s website, and then the authentication cookie will be sent. Not Sad.
The fix specifically for ASP.NET Core
Given that the redirect in step3 is handled by ASP.NET Core’s authentication system, we need a way to hook into it and override the redirect. Unfortunately there’s no event that’s raised at the right time for us to change how the redirect is done. So instead we use middleware so we can catch the response before it leaves the pipeline:
public void Configure(IApplicationBuilder app)
{
   app.Use(async (ctx, next) =>
   {
      await next();

      if (ctx.Request.Path == "/signin-oidc" &&
          ctx.Response.StatusCode == 302)
      {
          var location = ctx.Response.Headers["location"];
          ctx.Response.StatusCode = 200;
          var html = $@"
             <html><head>
                <meta http-equiv='refresh' content='0;url={location}' />
             </head></html>";
          await ctx.Response.WriteAsync(html);
      }
   });
   app.UseAuthentication();
   app.UseMvc();
}
This puts a middleware in front of the authentication middleware. It will run after the rest of the pipeline and inspect responses on the way out. If the request was for the application’s authentication redirect callback from step3 (in this case the typical path when using OpenID Connect) and the response is a redirect, then we capture that redirect location and change how it’s done using the client-side <meta> tag approach instead.
Front-channel sign-out notification for OpenID Connect
It turns out there’s another type of request into your app from the external provider when using OpenID Connect, which is the front-channel sign-out notification request. This request is performed in an <iframe> and requires the user’s authentication cookie to perform the sign-out. Given that this is absolutely cross-site, this means the same-site cookie would be blocked by the browser. We need to perform the same sort of trick to get the browser to make this request originating from our application so the browser considers it same-site.
Here’s the additional code to handle this type of request:
public void Configure(IApplicationBuilder app)
{
   app.Use(async (ctx, next) =>
   {
      if (ctx.Request.Path == "/signout-oidc" &&
          !ctx.Request.Query["skip"].Any())
      {
         var location = ctx.Request.Path +
            ctx.Request.QueryString + "&skip=1";
         ctx.Response.StatusCode = 200;
         var html = $@"
            <html><head>
               <meta http-equiv='refresh' content='0;url={location}' />
            </head></html>";
         await ctx.Response.WriteAsync(html);
         return;
      }

      await next();

      if (ctx.Request.Path == "/signin-oidc" &&
          ctx.Response.StatusCode == 302)
      {
          var location = ctx.Response.Headers["location"];
          ctx.Response.StatusCode = 200;
          var html = $@"
              <html><head>
                 <meta http-equiv='refresh' content='0;url={location}' />
              </head></html>";
          await ctx.Response.WriteAsync(html);
      }
   });
   app.UseAuthentication();
   app.UseMvc();
}
The workflow for this request is simply re-issuing the request to the sign-out notification endpoint, with the difference being that it will now be same-site. The “skip” flag is needed to ensure we don’t re-issue the request again on that next request.
More general ASP.NET Core solution
The above code is fine if you’re willing to hand-code (and know) the endpoints that you need to convert the cross-site redirect into same-site redirects. But if you have several endpoints because you’re dealing with several external providers, then this might be tedious. Here’s a more generalized solution to the problem:
public void Configure(IApplicationBuilder app)
{
   app.Use(async (ctx, next) =>
   {
        var schemes = ctx.RequestServices.GetRequiredService<IAuthenticationSchemeProvider>();
        var handlers = ctx.RequestServices.GetRequiredService<IAuthenticationHandlerProvider>();
        foreach (var scheme in await schemes.GetRequestHandlerSchemesAsync())
        {
            var handler = await handlers.GetHandlerAsync(ctx, scheme.Name) as IAuthenticationRequestHandler;
            if (handler != null && await handler.HandleRequestAsync())
            {
                // start same-site cookie special handling
                string location = null;
                if (ctx.Response.StatusCode == 302)
                {
                    location = ctx.Response.Headers["location"];
                }
                else if (ctx.Request.Method == "GET" && !ctx.Request.Query["skip"].Any())
                {
                    location = ctx.Request.Path + ctx.Request.QueryString + "&skip=1";
                }

                if (location != null)
                {
                    ctx.Response.StatusCode = 200;
                    var html = $@"
                        <html><head>
                            <meta http-equiv='refresh' content='0;url={location}' />
                        </head></html>";
                    await ctx.Response.WriteAsync(html);
                }
                // end same-site cookie special handling

                return;
            }
        }

      await next();
   });
   app.UseAuthentication();
   app.UseMvc();
}
The above code is, in essence, the same code from ASP.NET Core’s UseAuthentication for dealing with requests from external providers. I have simply weaved the redirect handling logic into the normal processing that was being done for normal ASP.NET authentication. Perhaps this type of behavior might make its way into ASP.NET Core in the future.
HTH
The State of the Implicit Flow in OAuth2
This blog post is a summary of my interpretation and perspective of what’s been going on recently with the implicit flow in OAuth2, mainly spurred on by the recent draft of the OAuth 2.0 for Browser-Based Apps (which I will refer to here as OBBA) and the updated OAuth 2.0 Security Best Current Practice (which I will refer to as the BCP) documents from the OAuth2 IETF working group. These are still in draft, so it’s possible they might be changed in the future.
This is a long post because these new documents have forced the community to rethink the security practices we’ve been using for several years now.
A brief history of the implicit flow
The implicit flow in OAuth2 and later adopted in OpenID Connect (OIDC) was originally designed to accommodate client-side browser-based JavaScript applications (also known as “single page applications” or “SPAs”). At the time it was introduced into the specification with trepidation due to concerns with the nature of these public clients running in the browser. A public client is one is running on a user’s device and thus can’t keep a secret and can’t properly authenticate back to the token server. Native apps also fall under that category.
This trepidation was documented in the RFC6819, the OAuth 2.0 Threat Model and Security Considerations spec. In fact, many threats for all the flows are covered in that RFC, and any decent client and token server implementations should heed the advice (for example, using the state parameter for cross-site request forgery (CSRF) protection, exact redirect URI matching, etc.). But the aspect of the implicit flow that is most criticized as difficult to protect is also the fundamental mechanic of what defines the implicit flow, namely that the access token is returned from the token server to the client from the authorize endpoint.
Concretely, the concern is that the access token is delivered to the client via the front-channel in a hash fragment parameter in the redirect URI. Returning the access token in the URL means it’s visible in the browser’s address bar, browser history, and possibly in referrer headers. Given the complexity of HTML, CSS, JavaScript, and browsers there is potential for this access token to leak from the URL. Also, OAuth2 (by itself), doesn’t provide a mechanism for a client to validate that the access token wasn’t injected maliciously. Now that doesn’t mean there were not mitigations against these concerns. Anyone who has ever come to our workshop or hired us for consulting would get an earful on the steps that you need to take in your applications to mitigate these threats. But these mitigations made use of features from OIDC and some strict programming practices. Not everyone using OAuth2 knew to use these mitigations.
One question that would commonly be asked about making browser-based clients more secure is “what about code flow – why can’t we use that instead?”. It turns out code flow (by itself) was worse because 1) public clients don’t use a real secret to exchange the code at the token endpoint, so an attacker could just as easily steal the code to obtain the access token, 2) codes passed via the query string are sent to the server (whereas fragment values are not), so they would be exposed more than when using implicit flow, 3) the client is required to make more requests to complete the protocol for no additional security, and 4) to use the token endpoint the token server would need to support CORS, and CORS was not yet widely enough supported by browsers. At that time, the spec designers could not take a dependency on CORS thus they had to find an alternative. I think this is (at least) one of the main reasons implicit as a flow was originally devised.
The spec committee has long wanted something built into the protocol itself to help protect against this threat of access token leakage from the URL. There are numerous posts on the working group email list that discuss this (from the time OAuth2 started being developed in 2010 and since it’s completion in 2012). But, at the time, the implicit flow was the best they had to offer. It was important that they provided some guidance rather than no guidance for fear of people inventing their own security protocols.
And just so we’re all clear on the value of specifications; they are pre-vetted threat models. That’s why we like them and (typically) follow them, because there is a high level of scrutiny, many people have thought about the attacks, documented the approaches we can take to mitigate them, and educated us on the current known issues for the types of activities we’re trying to perform. Without them each developer would have to come up with their own security and threat model it and that historically hasn’t sufficed.
A new hope
Since October 2012 when the OAuth2 RFC was released, the implicit flow was “the best we had” for client-side browser-based JavaScript applications. As a point of reference, recall that client-side JavaScript and full-blown SPAs still weren’t mainstream. For example, AngularJS didn’t really start to get popular until 2014.
Nonetheless, in the working group there was still a desire to “do better” when it came to the implicit flow. Looming on the horizon was hope: HTTP token binding (first introduced in 2015). HTTP token binding was a new spec that would (basically) tie the token to a particular TLS connection ensuring only the rightful client could use that token. This provided a solution to address the concerns about exfiltrating tokens from the browser (and other types of clients too). Things were looking up and the future of security was good. In fact, work was in progress in 2016 to incorporate this new token binding feature into the OAuth2 protocol, but then, unfortunately, in 2018 Google made the decision to drop support for this “unused feature” in their Chrome browser. This effectively made token binding impractical for browser-based clients (despite the final token binding RFCs being completed in the same month).
Around the same time (in 2015) the OAuth2 working group devised RFC7636 Proof Key for Code Exchange by OAuth Public Clients (also known as PKCE) to address an attack against native clients. The attack involved stealing the authorization code as it was being sent back to the client in the redirect URI, and since public clients don’t have a real secret then the authorization code issued was as good as the access token. The mitigation used in PKCE was to create a new dynamic secret each time a client needed to connect to the authorize endpoint. This dynamic secret would then be used on the token endpoint and the token server would help guarantee that only the rightful client could use the code to obtain the corresponding access token.
I don’t think anyone in the OAuth2 working group anticipated it, but PKCE turned out to be useful for all types of clients not just native ones. Given that token binding had fizzled, the idea of using code flow with PKCE became a candidate to address the issue of access tokens being exposed in the redirect URI for implicit clients. Also, by this time CORS had finally become well enough supported that it could be utilized for these browser-based clients. This confluence is what seems to have galvanized the work on the documents that this blog post is about.
The OAuth 2.0 for Browser-Based Apps document
In addition to including many of the suggestions already described in the existing RFC6819 OAuth 2.0 Threat Model and Security Considerations, and the use of some other already well-known security practices for JavaScript apps (such as using CSP and CORS), OBBA, in short, recommends using code flow with PKCE to mitigate the potential exposure of the access token from the URL. That’s the main thrust of the document. That’s it.
And having thought about it, despite having all the existing mitigations for implicit flow, I agree that code flow with PKCE is valid advice and an improvement. Justin Richer, on the working group email list, summarized it the best in my opinion:
“The limitations and assumptions that surrounded the design of the implicit flow back when we started no longer apply today. It was an optimization for a different time. Technology and platforms have moved forward, and our advice should move them forward as well.”
As such, I have updated my OIDC certified client library oidc-client-js to support code flow with PKCE as of 1.6.0 (released in December 2018). I will follow up with another blog post on those details.
Other recommendations in OBBA
My summary of OBBA is a bit curt; it actually does provide a few other recommendations for JavaScript apps. The first has to do with same-domain apps, and the second has to do with the elephant in the room now that code flow is in play which has to do with refresh tokens. I have concerns about the latter.
Same-domain apps
Same-domain applications are those where the client-side browser-based application is hosted from the same domain as the API that it is invoking. Often an application would use a cookie as the authentication mechanism when making the calls to the backend API, but that design was discouraged for many years due to the potential for CSRF attacks on the API. Using token-based authentication was an approach to mitigate the CSRF attack, and those tokens would be obtained by the client-side JavaScript application using OAuth2 (and presumably with the implicit flow).
The somewhat surprising recommendation in OBBA for same-domain applications is to not use OAuth2 at all and use the old approach of using cookies to authenticate to the backend API. Suggesting an approach that makes security worse seems counterproductive, but the recommendation is based on yet another recent security specification: Same-site Cookies. Same-site cookies allows a web server, when issuing a cookie, to instruct the browser to only send the cookie when requests comes from the domain that issued the cookie. This behavior mitigates the CSRF attack.
Given that same-site cookies have sufficient browser support now, it seems practical to rely upon it for our CSRF protection and thus this recommendation in OBBA is also convincing. But at the same time it’s sort of ironic that the OAuth 2.0 for Browser-Based Apps best practices document suggests not using OAuth.
Anyway, this doesn’t help you if your API must be accessed by clients on different domains or from clients that aren’t running in the browser, so using OAuth2 and token-based security for your API for those scenarios is still appropriate.
Token renewal and refresh tokens
Access tokens expire and client applications need some user-friendly mechanism for renewing those access tokens. Prior to OBBA, a common renewal technique for implicit clients would was to make a new request to the authorization endpoint but using a hidden iframe. In fact, the OIDC spec even added a provision for this style with the prompt=none authorization request parameter. This relied upon the user’s authentication session (typically in the form of a cookie) at the token server for this to succeed. This approach works fairly well (if you can get over your incense of still using an iframe in this day and age). Recall, though, that when the implicit flow was developed CORS was still not a viable option. And even with the updated guidance in OBBA, the iframe approach is still a valid approach.
Now that our browser-based JavaScript application will now be using code flow, the obvious question comes up “why couldn’t we use refresh tokens now instead of iframes to renew access tokens?”. This is technically possible (again, assuming CORS), but the concern is that if the refresh token is exfiltrated from the browser then it can be used by an attacker to perpetually access the API on behalf of the user. Unbound refresh tokens issued to public clients are more powerful (and therefore dangerous) than an individual access token. As such, OBBA states that you should not use refresh tokens for browser-based applications. Case closed, right? Maybe…
The practical effects of OBBA and BCP
The intent of the OBBA guidance was meant to simplify the work needed to be performed in a browser-based JavaScript application to obtain access tokens, and to reduce the mental burden on the application developer so that they did not need to be security experts. But, unfortunately, I worry these documents will have the opposite effect.
The OBBA has language that seems to contradict the earlier statement about not using refresh tokens. The OBBA and the BCP (the other document this post is about) both indicate that you need to evaluate for yourself if you want to use refresh tokens in browser-based clients.
To their credit, both documents provide guidance on ways to protect the refresh token in the browser and mitigate abuse by an attacker. The main mitigations include using a client-bound refresh token and/or performing refresh token expiration and rotation when the refresh token is used. Unfortunately, these mitigations might not be available based on the situation. Having said that, I also added refresh token support to oidc-client-js in 1.6.0, including renewal and revocation. Again, more about that in another blog post.
If you wish to use refresh tokens in the browser, this means you must use a token server that has the mitigation features described in these documents. Not all token servers support these recommendations. I believe one intended audience of these documents is the token server vendors. But on the working group email list I see some vendors that express concern that they will not be able to accommodate the approaches recommended (or at least not soon). Having said that, IdentityServer already has support for many of the recommendations, and we are making plans to add additional mitigations.
This escape clause is the concern I have with these documents. I’m left uneasy with the burden now being back on the developer to decide to use refresh tokens and evaluate their token server’s support for mitigations for use with browser-based clients. The developer will need to know how to use them, configure them properly, know how to protect them in their client, and how to threat model those decisions. We know that most developers are not security specialists. From that perspective, perhaps this is a step backwards in terms of improving overall security. I suspect we will see compromises in the future based on refresh tokens being used in the browser.
Where are we?
After all of this, what options are we left with? It seems we have three styles for our client-side browser-based JavaScript clients calling APIs:
Same-domain apps with cookies
This style would be for same-domain applications that use same-site (and HTTP-only, as always) cookies to authenticate to an API backend. The backend would issue the cookie based on the user’s authentication (which itself could be as a result of SSO to an OIDC token server), and cookies would be renewed while the user is still active in the client. This style of application would use well-established approaches for securing the client, including CSP. This style is admittedly the easiest for the developer. The main downside might be the requirement to run in older browsers.
OAuth2 clients without using refresh tokens
This style would be for browser-based clients that need to use cross-domain APIs, or an API that only accepts tokens (and doesn’t support cookies). This client would use code flow with PKCE to obtain the access token, but the rest would be essentially the same as an implicit client would do today, including using an iframe to renew access tokens. Again, standard approaches should be used to secure the client application (including CSP). The token server will need to support CORS and PKCE, and the ability the renew tokens is based on the user’s session at the token server.
OAuth2 clients using refresh tokens
This style is essentially the same as the previous, except that refresh tokens would be obtained by the client and used to renew access tokens. To mitigate the attacks against the refresh token being leaked the token server needs to support some sort of client-bound refresh tokens, or a refresh token expiration and rotation strategy.
Choose wisely.
In ASP.NET Core 2.1 one of the security changes was related to how authorization filters work. In essence the filters are now combined, whereas previously they were not. This change in behavior is controlled via the AllowCombiningAuthorizeFilters on the MvcOptions, and also set with the new SetCompatabilityVersion API that you frequently see in the new templates.
Prior to 2.1 each authorization filter would run independently and all the authorization filters would need to succeed allow the user access to the action method. For example:
[Authorize(Roles = "role1", AuthenticationSchemes = "Cookie1")]
public class SecureController : Controller
{
    [Authorize(Roles = "role2", AuthenticationSchemes = "Cookie2")]
    public IActionResult Index()
    {
        return View();
    }
}
The above code would trigger the first authorization filter and run “Cookie1” authentication, set the HttpContext’s User property with the resultant ClaimsPrincipal, and then check the claims for a role called “role1”. Then, the second authorization filter and run “Cookie2” authentication, overwrite the HttpContext’s User property (thus losing the “Cookie1” user’s claims) with the resultant ClaimsPrincipal, and then check the claims for a role called “role2”. In short, the user had to have both cookies to be granted access. Also, as side effect of this is also that in the action method, the code would only see the claims from “Cookie2”.
With the new compatibility changes in 2.1, the behavior of the above authorization filters has changed. The mechanics are that the authorization filters are now combined (somewhat). The roles are still kept separate, meaning the user must still have both “role1” and “role2”. But the surprising change is that now instead of both schemes being required, now only one is.
What happens is that both “Cookie1” and “Cookie2” are authenticated (if present) and the resultant claims are combined into the one User object. Then the checks for both “role1” and “role2” are done. So if both roles were only in one cookie, then access would be granted. And, of course, in the action method the combined claims from “Cookie1” and “Cookie2” would be available.
This is a different semantic that the way things previously worked. In essence your authorize filter requirements might be relaxed due to the presence of other authorize filters in the action method invocation hierarchy.
A scenario would this might be a issue is where you have an app that has both UI and APIs. A common technique is to use a global filter as a blanket protection to requires that all users be authenticated in the rest of the app:
services.AddMvc(options =>
{
   var policy = new AuthorizationPolicyBuilder()
      .AddAuthenticationSchemes(“ApplicationCookie”)
      .RequireAuthenticatedUser()
      .Build();
   options.Filters.Add(new AuthorizeFilter(policy));
});
And then an API action method like this:
[Authorize(AuthenticationSchemes = "Bearer")]
public IActionResult PostData()
{
    ...
}
This new behavior opens us up to possible XSRF attacks on our APIs, whereas pre-2.1 the explicit authentication scheme on the action method protected us.
Now of course, policy schemes (aka virtual schemes), which are also new in 2.1, could help us address this, but that’s a design change in your app.
I agree with the suggestion by Microsoft in the docs that for this new feature:
We recommend you test your application using the latest version (CompatibilityVersion.Version_2_1).
But not so sure about their other comment:
We anticipate that most applications will not have breaking behavior changes using the latest version.
So, beware the side effects of the new combined authorization filter behavior in ASP.NET Core 2.1.
IdentityManager2
In 2014 I developed and released the first version of IdentityManager. The intent was to provide a simple, self-contained administrative tool for managing users in your ASP.NET Identity or MembershipReboot identity databases. It targeted the Katana framework, and it served its purpose.
But now that we’re in the era of ASP.NET Core and ASP.NET Identity 3 has come to supplant the prior identity frameworks, and it’s time to update IdentityManager for ASP.NET Core. Unfortunately I’ve been so busy with other projects I have not had time. Luckily Scott Brady, of Rock Solid Knowledge, has had the time! They have taken on stewardship of this project so it can continue to live on.
I’m happy to see they have released the first version of IdentityManager2. Here’s a post on getting started. Congrats!
Since the release of our IdentityModel.OidcClient client library we have had iOS and Android samples for using the system browser to allow a user to authenticate with the token server. Receiving the results from the system browser is interesting since the native client application is in a different process than the system browser. Fortunately those platforms provide an easy way to map a custom URI scheme (used in the client’s redirect_uri) to the native client application. This allows the response parameters from the authorize endpoint to be passed from the system browser into the native client so it can complete the protocol workflow.
Windows also has such a facility, but we never had a sample for it… until now. I just created a sample that does this.
There are two main aspects that are specific to Windows clients. First, the application needs to add certain registry keys to enable this mapping. The sample adds them when it starts. Second, when the browser redirects to the custom URI scheme it launches a new instance of the client application. This means the first instance that initiated the request is still waiting for the response. The second instance needs a mechanism to deliver the results to the first. The sample handles this by using named pipes.
I certainly had to dust off all the Win32 API cobwebs I had rattling around in the back of my brain. Anyway, check it out and hope it helps.
Sponsoring IdentityServer
Brock and I have been working on free identity & access control related libraries since 2009. This all started as a hobby project, and I can very well remember the day when I said to Brock that we can only really claim to understand the protocols if we implement them ourselves. That’s what we did.
We are now at a point where the IdentityServer OSS project reached both enough significance and complexity what we need to find a sustainable way to manage it. This includes dealing with issues, questions and bug reports as well as feature and pull requests.
That’s why we decided to set up a sponsorship page on Patreon. So if you like the project and want to support us – or even more important, if you work for a company that relies on IdentityServer, please consider supporting us. This will allow us to be able to maintain…
View original post 6 more words
Slides — Boston Code Camp, Fall 2017
Here are the slides for my session “Implementing Authorization forApplications & APIs” from Boston Code Camp. We plan to announce more in January about the code. Thanks for coming!
The userinfo endpoint is not designed for APIs
A common (but incorrect) practice I often see people doing is using the OIDC userinfo endpoint from APIs. It seems like a natural thing to want to do — you have an access token in your API and it contains identity scopes. This means the access token can be used at the userinfo endpoint to access the identity data for those scopes (like profile, email, phone, etc.). The problem is that the userinfo endpoint is designed for the client, not the API (after all, userinfo is defined in the OIDC spec, not the OAuth2 spec).
Another way to think of the problem is that the API has no control over the scopes that access token has been granted. The client controls those scopes. This means your API is taking a dependency on the identity information the client is configured to obtain from the token server, and this is quite brittle. If the client ever changes what identity scopes they request, your API is affected.
A better approach is to configure your API to request the claims that it needs for the user. That’s why there’s a UserClaims property on the ApiResource (and Scope) configuration object model(s) in IdentityServer. These configured user claims will be delivered to the API in the access token itself (or from introspection if using reference tokens). This allows your API to be explicit about what it needs about the user, regardless of the client’s configuration.
DevIntersection Las Vegas, October 2017
I will be speaking at DEVintersection this October in Las Vegas. The highlight will be the 2-day workshop on “Identity & Access Control for Modern Applications and APIs using ASP.NET Core”. If you register, use promo code “ALLEN” for a discount.
I also have two sessions, one on the fundamentals of OpenID Connect and OAuth2, and another on an introduction to IdentityServer for ASP.NET Core.
Hope to see you there!
In ASP.NET Core, you can add a claims transformation service to your application, as such:
public void ConfigureServices(IServiceCollection services)
{
   services.AddMvc();
   services.AddAuthentication(options=>
   {
      options.DefaultScheme = CookieAuthenticationDefaults.AuthenticationScheme;
   }).AddCookie();

   services.AddTransient<IClaimsTransformation, ClaimsTransformer>();
}
And then your ClaimsTransformer might look like this:
class ClaimsTransformer : IClaimsTransformation
{
   public Task<ClaimsPrincipal> TransformAsync(ClaimsPrincipal principal)
   {
     ((ClaimsIdentity)principal.Identity).AddClaim(new Claim("now", DateTime.Now.ToString()));
     return Task.FromResult(principal);
   }
}
And that might be fine. But beware that this might be invoked multiple times. If an app has this code (perhaps in different locations in the app which might be likely):
await HttpContext.AuthenticateAsync();
await HttpContext.AuthenticateAsync();
Then each time AuthenticateAsync is called the claims transformer is invoked. So given the above implementation we’d be adding the “now” claim multiple times.
Moral of the story, claims transformation should be more defensive and/or return a new principal, as such:
class ClaimsTransformer : IClaimsTransformation
{
   public Task<ClaimsPrincipal> TransformAsync(ClaimsPrincipal principal)
   {
      var id = ((ClaimsIdentity)principal.Identity);

      var ci = new ClaimsIdentity(id.Claims, id.AuthenticationType, id.NameClaimType, id.RoleClaimType);
      ci.AddClaim(new Claim("now", DateTime.Now.ToString()));

      var cp = new ClaimsPrincipal(ci);

      return Task.FromResult(cp);
   }
}
HTH
Demos — DevTeach Montreal, July 2017
The demos and slides for my sessions from DevTeach are here: https://1drv.ms/f/s!AjXKCyy1XZYBjyO7i8tyom6PhJM_ and the home page for IdentityServer is http://identityserver.io/.
Thanks for coming!
VS Live Redmond, August 2017
I’ll be doing a 1-day version of our Modern Security for ASP.NET Core workshop at VS Live in Redmond on August 14th, 2017. If you’re interested, you can get $500 off the conference 5-day price by using the code “RDSPK01” at registration.
I’m also doing two sessions: One on User Authentication for ASP.NET Core web applications, and another on Securing APIs in ASP.NET Core.
Hope to see you there!
Rhode Island OWASP, Tuesday June 20th, 2017
I’ll be speaking at my local OWASP chapter in Rhode Island tomorrow (Tuesday June 20th, 2017). The topic will be on (of course) modern security architecture with OpenID Connect.
Hope to see you there!
DevTeach, Montreal 2017
I’ll be speaking at DevTeach in Montreal this July, 2017. I am doing a one-day version of our security workshop, and two sessions (one on IdentityServer and another on securing SPA/JavaScript applications and APIs).
Hope to see you there!
DevSum Stockholm and NDC Oslo, 2017
I’ll be speaking at DevSum in Stockholm, Sweden in early June. I’ll be doing a one-day version of our modern ASP.NET Core security course, and a session on securing JavaScript/SPA and API applications.
The week after, I’ll be speaking at NDC in Oslo, Norway. Dominick and I will be doing a two-day version of our modern ASP.NET Core security course, and a session on authorization patterns for .NET applications.
Hope to see you there!
Demos — Boston Code Camp, March 2017
The demos and slides for my “Securing ASP.NET Core Web Applications and APIs using IdentityServer” session are here: https://1drv.ms/f/s!AjXKCyy1XZYBjnNA6hk-4Spii0jE.
Thanks for coming!
DevIntersection Orlando, May 2017
I will be speaking at DevIntersection this May (not Las Vegas — that’s in October) in Orlando. The highlight will be the 2-day workshop on “Identity & Access Control for Modern Applications and APIs using ASP.NET Core”. If you register, use promo code “ALLEN” for a discount.
I also have two sessions, one on “Securing Web APIs from JavaScript/SPA Applications” and one on “Securing Web APIs from Mobile and Native Applications”.
Hope to see you there!
SDD London, May 2017
As is the tradition in the spring, I will be speaking at SDD in London this May. I have sessions on ASP.NET Identity, securing SPAs and we’re also doing our workshop in a 1-day format. Hope to see you there!
NDC London 2017
As always – NDC was a very good conference. Brock and I did a workshop, two talks and an interview. Here are the relevant links:
- Building JavaScript and mobile/native Clients for Token-based Architectures
- IdentityServer4: New & Improved for ASP.NET Core
- DotNetRocks Interview
- Slides
Check our website for more training dates.
OpenID Connect Client Library for JavaScript/SPA-style Applications
In addition to our native library – Brock successfully certified his JavaScript library with the OpenID Foundation.
oidc-client-js is by far the most easy and elegant way I have seen so far for integrating OpenID Connect and OAuth 2 client functionality into JavaScript – highly recommended!
See here for a step-by-step tutorial on how to use it.
MVP MIX Dallas 2017
I’ll be doing a 1-day version of our workshop on Identity and Access Control for Modern Applications and APIs using ASP.NET Core at MVP MIX in Dallas this March 2017.
Hope to see you there!
Demos — Boston Code Camp, November 2016
Here are the slides/demos from my ASP.NET Core security talk today at the Boston Code Camp. Thanks!
https://1drv.ms/f/s!AjXKCyy1XZYBjWhdGgGY2qR0-R28
Also, here’s the link to the IdentityServer website.
Process.Start for URLs on .NET Core
Apparently .NET Core is sort of broken when it comes to opening a URL via Process.Start. Normally you’d expect to do this:
Process.Start("http://google.com")
And then the default system browser pops open and you’re good to go. But this open issue explains that this doesn’t work on .NET Core. So instead you have to do this (credit goes to Eric Mellino):
public static void OpenBrowser(string url)
{
    try
    {
        Process.Start(url);
    }
    catch
    {
        // hack because of this: https://github.com/dotnet/corefx/issues/10361
        if (RuntimeInformation.IsOSPlatform(OSPlatform.Windows))
        {
            url = url.Replace("&", "^&");
            Process.Start(new ProcessStartInfo("cmd", $"/c start {url}") { CreateNoWindow = true });
        }
        else if (RuntimeInformation.IsOSPlatform(OSPlatform.Linux))
        {
            Process.Start("xdg-open", url);
        }
        else if (RuntimeInformation.IsOSPlatform(OSPlatform.OSX))
        {
            Process.Start("open", url);
        }
        else
        {
            throw;
        }
    }
}
I added a few more fixes for Windows — one was suppressing the second command prompt, and another was escaping the “&” with “^&” so the shell does not treat them as command separators.
Fun times in this cross-platform world.
SDD Deep Dive, London 2016
In November 2016, Dominick and I will be speaking together at SDD Conf in London. We’re doing a 3-day version of our Identity & access control for modern web applications & API workshop which now targets ASP.NET Core and IdentityServer4.
The 3-day format allows much more time for hands-on labs, as well as in-depth discussions of how to architect for single sign-on and web API security. Also, we have extra time allotted to show how to customize and configure IdentityServer4.
Hope to see you there!
DEVintersection/IT Edge Las Vegas, October 2016
I’ll be speaking at DEVintersection/IT Edge in Las Vegas this October, 2016. I’m doing a 2-day workshop on Identity & Access Control for ASP.NET Core Applications and APIs which is targeting ASP.NET Core. I’m also doing a few sessions; one on mobile application security, one on JavaScript/SPA application security, and one on the new policy-based authorization system in ASP.NET Core.
Also, apparently there’s a promo code “ALLEN” you can use to get some money off the conference admission.
Hope to see you there!
Commercial Support Options for IdentityServer
Many customers have asked us for production support for IdentityServer. While this is sometime we would love to provide, Brock and I can’t do that on our own because we can’t guarantee the response times.
I am happy to announce that we have now partnered with our good friends at Rock Solid Knowledge to provide commercial support for IdentityServer!
RSK has excellent people with deep IdentityServer knowledge and Brock and I will help out as 2nd level support if needed.
Head over to https://www.identityserver.com/ and get in touch with them!
Check session support in oidc-client-js
Single sign-out is a tricky business. For JavaScript-based applications OIDC provides the session management specification as a mechanism to be notified when the user has signed out or changed their login status at the OpenID Connect provider. It’s a somewhat confusing to read, and even more so to implement. For developers using IdentityServer, we always had samples for this which would help get this support into developers’ hands. But the samples were only that, samples.
Today I’m happy to announce that oidc-client-js (our OIDC/OAuth2 protocol library for browser-based JavaScript application) now supports the session management specification. This means one less piece of security plumbing you need to keep track of in your JavaScript-based applications.
Internally the UserManager will create the RP iframe necessary to poll the user’s session_state cookie. When the user’s status changes at the OP it will also attempt to silently re-query the OP to see if the user is still really signed in, or if they’re really signed out. Once it has determined that the user is really signed out of the OP, an event is raised letting your application know that the user has performed a signout. At this point, it’s up to your application to decide what to do. Here’s a snippet of registering for the event:
var settings = {
    authority: "https://localhost:44333/core",
    client_id: "js.usermanager",
    redirect_uri: "https://client.com/callback.html",
    response_type: "id_token token",
    scope: "openid profile email read write",
    silent_redirect_uri: "https://client.com/silent_renew.html"
};
var mgr = new Oidc.UserManager(settings);

mgr.events.addUserSignedOut(function () {
    log("user signed out");
});
Feel free to try it out (npm, github) and let us know how you like it. Thanks!
Demos — NDC Oslo 2016
Here are the demos from my ASP.NET Identity 3 session at NDC Oslo 2016.
Looks like the recording is up too: https://vimeo.com/172009501
Thanks!
Don’t use TOTP for password resets
I saw a thread on the github issue tracker where someone was complaining that email verification and password reset tokens were too long in ASP.NET Identity 3. They are and I think this is a valid complaint because an end user can’t possibly type in the entire thing if necessary (for some reason line breaks are notorious in email readers and it always seems to happen to my sister in-law).
A suggestion was made on this thread to replace the normal data protection token generator with the TOTP (time based one-time password) generator so it would produce nice short 6 digit code. The problem with this is that an attacker can try to mount a brute force attack guessing all the possible codes within the validity window of the TOTP code (3 minutes in the ASP.NET Identity implementation). That means an attacker could try to guess all one million codes and they might get lucky in that much time. If they do, then they will be able to reset the password and pwn the account.
To properly mitigate against this, you need to do brute force protection on failed password reset requests. ASP.NET Identity does not do this for password reset requests (they do for login requests for both passwords and 2FA codes). I suppose they don’t perform this brute force check for password reset requests because the assumption is that they are using the default data protection mechanism which does mitigate this attack. So by default, ASP.NET Identity 3 is safe from this, but please don’t replace the plumbing without knowing what the consequences are.
Yea, security is hard.
oidc-client re-released
As part of building IdentityServer, we felt it was important to have lots of sample code to show how a developer can build client applications. And of course given the interoperability goal of OIDC, SPA-style JavaScript applications should be one of those samples.
When I started building our sample I found that there was no OIDC client JavaScript library out there (several OAuth2 ones, and vendor-specific ones, but not a pure OIDC protocol library). Of course, necessity is the mother of invention so I started working on one for our sample. This sample grew into a couple of ad-hoc libraries which were known as the OidcClient and TokenManger libraries. I even spoke about them at NDC last year.
Unfortunately, as samples tend to be turned into libraries on an as-needed basis, the organic nature of the evolution means that sometimes the code is not as well planned out and organized (or just not as pretty) as one would like it to be. I was called out for this several months ago, so with some corporate and community support I endeavored to re-write the library and clean it up using more modern techniques and tools.
Over the past 2 or 3 months I have rewritten the prior two libraries. They are now consolidated into one library, written in ES6, transpiled with babel, packed with webpack, built with gulp, and unit tested with mocha and chai. I feel pretty hip saying all those buzzwords in a single sentence, but I digress. In addition to the re-write, I’ve added a few more features and cleaned up existing ones.
So I’m quite happy to have released the rewritten and enhanced oidc-client this morning to npm. If you’re building a SPA style JavaScript application and need to handle authentication and calling secure web APIs using tokens from OIDC and OAuth2, try it out.
Feedback welcome. Enjoy.
Demos — SDD, May 2016
I did three sessions during SDD this past week in London. Here are the links to the slides/demos:
Thanks to the organizers and attendees!
Federated sign-out and IdentityServer3
The federation gateway pattern
Consider a scenario where you are building an application that requires the user to login from a variety of identity providers (IdPs). It is possible to implement the logic necessary to juggle the different IdPs from within a single application. But once you have more than one application with this same requirement it is undesirable to repeatedly re-implement this logic in each application.
This is where the “federation gateway” architectural pattern is commonly used. This involves using a token service in-between you applications and the IdPs being used. The logic of juggling the different IdPs is then consolidated in the gateway, and your applications are abstracted from these details.
IdentityServer3 can be (and frequently is) used in this capacity.
Below is a picture of the federation gateway pattern:

Federated sign-out
It’s not inconceivable that an IdP that’s being used has other applications relying upon it for authentication beyond your federation gateway. For example:

So what happens with a user of “Not Your App” logs out? Well, single sign-out can be done in many ways. Regardless of the approach, normally the user is redirected to the IdP to sign-out (“SalesForce” in the picture above). At this point, it would be quite useful for your gateway to know that this has occurred. Once your gateway knows the user has signed out of the IdP, the gateway can sign the user out, and then notify your applications to sign the user out as well.
This is all possible in IdentityServer3 as of build 2.2 released in November 2015, assuming the IdP being used supports a “front-channel” approach for single sign-out. Recall that a “front-channel” approach to sign-out creates an <iframe> to each of the client applications in the context of the user’s browser session, thus allowing the application to do any session related cleanup (such as revoking cookies).
To achieve this it is necessary for you to build an endpoint within the gateway that can act as the “cleanup endpoint” (which will be the target of the IdP’s <iframe>). This is something you must do manually, since you might be using different protocols to authenticate to the IdP (e.g. OIDC or WS-Fed). This endpoint would need to run within IdentityServer’s pipeline, meaning the URL must be one such that the IdentityServer middleware is allowed to execute. From that endpoint you would then use an OWIN environment extension API called ProcessFederatedSignoutAsync that we provide. This API performs the federated sign-out.
The “cleanup endpoint” might look some like this:
public void Configuration(this IAppBuilder app)
{
   app.Map("/core", coreApp =>
   {
      var factory = new IdentityServerServiceFactory();

      // ...

      coreApp.UseIdentityServer(idsrvOptions);

      coreApp.Map("/signoutcleanup", cleanup =>
      {
         cleanup.Run(async ctx =>
         {
            await ctx.Environment.ProcessFederatedSignoutAsync();
         });
      });
   });
}
Depending on the protocol used with the IdP you might need more logic in here, but the above code is all that’s needed to handle signing out from IdentityServer and to the applications using IdentityServer for authentication (assuming the applications themselves participate in single sign-out).
You can read more about the federated sign-out support in our docs.
Single sign-out and IdentityServer3
Single sign-out (or single logout, or SLO) is the mechanism by which a user is able to sign-out of all of the applications they signed into with single sign-on (SSO) including the identity provider. The OpenID Connect set of specifications contain three different specifications for how to handle single sign-out. Each provides a different approach to solve the problem based upon the nature of the application architecture that’s involved in the SSO process. The fact that there are three different approaches to dealing with the problem should be a hint that performing single sign-out is complex.
One, known as the “session management specification“, is targeted at JavaScript-based/SPA-style applications (and thus also known as the JavaScript-based sign-out spec). Another one, known as the “HTTP-based logout specification“, is targeted at server-side web frameworks (such as ASP.NET), and is also known as the “front-channel” approach. The last one, known as the “back-channel logout specification“, also targets server-side applications but takes a different approach than the “front-channel” spec. Each has their pros and cons.
Since its first release IdentityServer3 has supported the JavaScript-based “session management specification”, and as of build 2.2 from November of 2015 alsos implements the “front-channel” specification.
The JavaScript-based approach in essence requires a client application to load an <iframe> to an endpoint in IdentityServer called the “check_session_iframe” (whose value is available from the metadata endpoint). This <iframe> (given that it is from the IdentityServer’s origin) can access the session cookie managed by IdentityServer and can detect when the user’s login session has changed (meaning the user has signed out, or has signed in as another user). Once the user’s session has changed then the JavaScript-based application hosting the <iframe> can be notified that the user is no longer logged into IdentityServer. At that point, it’s up to the application to decide what to do, but at least it knows the user’s login status has changed.
The “front-channel” spec takes a different approach. It allows a client application to preregister a “logout URL” with IdentityServer. When the user signs out of IdentityServer, then on the “signed out” page of IdentityServer an <iframe> is then rendered into the page for each client application that has a registered “logout URL”. The request in the <iframe> allows the client application to receive a notification in the context of the user’s browser session that they are now logged out. In this request the client application can decide how to cleanup the user’s session and the most common approach would be to revoke the user’s session cookie at the client application.
You can read more about IdentityServer’s single sign-out support here.
DEVintersection Orlando, April 2016
I will be speaking at DEVintersection in Orlando, FL in April, 2016. I will be doing our 2-day workshop on “Identity and Access Control and Modern Web Applications”, as well as a session on “Security in ASP.NET 5 and MVC 6”, er, I mean “Security in ASP.NET Core and MVC Core”.
Hope to see you there!
Demos — NDC London 2016
Slides and demos for my “Introduction to IdentityServer” talk from NDC London 2016 are here: https://onedrive.live.com/redir?resid=1965DB52C0BCA35!1697&authkey=!AJh-umfrMHA79jc&ithint=folder%2cpdf. Thanks for attending!
Edit: The video from the talk is here.
BrowsR helper for integration testing in ASP.NET 5
Dominick and I were working together on some unit tests for an ASP.NET 5 project. These tests were integration tests so we used the the TestServer from ASP.NET 5 TestHost project to load an entire ASP.NET pipeline. This allows you to use HttpClient to make HTTP calls into the running server. The main problem we had was that we needed to simulate a browser client that could hold onto cookies and follow redirects, so based upon Damian Hickey’s excellent OwinMessageHandler, we crufted up this for ASP.NET 5 (and of course had to give it a witty name):
public class BrowsR : DelegatingHandler
{
    private CookieContainer _cookieContainer = new CookieContainer();

    public bool AllowAutoRedirect { get; set; } = true;
    public bool AllowCookies { get; set; } = true;
    public int AutoRedirectLimit { get; set; } = 20;

    public BrowsR(HttpMessageHandler next)
        : base(next)
    {
    }

    protected async override Task<HttpResponseMessage> SendAsync(HttpRequestMessage request, CancellationToken cancellationToken)
    {
        var response = await SendCookiesAsync(request, cancellationToken);

        int redirectCount = 0;

        while (AllowAutoRedirect && (
                response.StatusCode == HttpStatusCode.Moved
                || response.StatusCode == HttpStatusCode.Found))
        {
            if (redirectCount >= AutoRedirectLimit)
            {
                throw new InvalidOperationException(string.Format("Too many redirects. Limit = {0}", redirectCount));
            }
            var location = response.Headers.Location;
            if (!location.IsAbsoluteUri)
            {
                location = new Uri(response.RequestMessage.RequestUri, location);
            }

            request = new HttpRequestMessage(HttpMethod.Get, location);

            response = await SendCookiesAsync(request, cancellationToken).ConfigureAwait(false);

            redirectCount++;
        }
        return response;
    }

    protected async Task<HttpResponseMessage> SendCookiesAsync(HttpRequestMessage request, CancellationToken cancellationToken)
    {
        if (AllowCookies)
        {
            string cookieHeader = _cookieContainer.GetCookieHeader(request.RequestUri);
            if (!string.IsNullOrEmpty(cookieHeader))
            {
                request.Headers.Add("Cookie", cookieHeader);
            }
        }

        var response = await base.SendAsync(request, cancellationToken);

        if (AllowCookies && response.Headers.Contains("Set-Cookie"))
        {
            var responseCookieHeader = string.Join(",", response.Headers.GetValues("Set-Cookie"));
            _cookieContainer.SetCookies(request.RequestUri, responseCookieHeader);
        }

        return response;
    }
}
public class Startup
{
    public void ConfigureServices(IServiceCollection services)
    {
        // ...
    }

    public void Configure(IApplicationBuilder app)
    {
        // ...
    }
}
To use it, then you’d do something like this:
var startup = new Startup();
var server = TestServer.Create(null, _startup.Configure, startup.ConfigureServices);
var handler = server.CreateHandler();
var client = new HttpClient(new BrowsR(handler));
var result = await client.GetAsync("...");
The requests will now follow redirects and hold onto cookies across those redirects. Too bad this isn’t built into the ASP.NET TestHost itself.
Enjoy.
Demos — Tech Intersection, September 2015
Here are the slides and demos from my session at Tech Intersection (from September 2015) on securing JavaScript based apps:
Thanks!
IdentityServer3 2.0.0 released
Just a quick note that IdentityServer3 2.0.0 has been released. We’ve taken a lot of good feedback from customers and tried to improve things in 2.0.0. Since we use semantic versioning, this release technically contains breaking changes, but depending on what you were using you may or may not see those changes. Dominick already explained some of the changes and the release notes sum up the rest.
You can get the NuGet here, and (as always) we appreciate questions and feedback via the issue tracker.
Thanks and enjoy!
Tech Intersection, September 2015
I will be speaking at the upcoming Tech Intersection conference (specifically the Security Intersection part) in Monterey, CA in September 2015. I have three sessions and a one-day workshop:
- Identity and access control for modern web and mobile applications
- Modern authentication for ASP.NET MVC 6 applications
- Building secure JavaScript and Web API applications with OAuth2
Hope to see you there!
SDD Deep Dive, London 2015
Dominick and I will be doing a 3-day workshop on single sign-on and web api security at SDD Deep Dive in London this November (2015). This is much like our previous workshops, but what makes it special is that we have 3 full days and on the final day we’ll be spending some time showing the most common configurations and customizations to IdentityServer.
This is your chance to come and learn how to secure your modern web applications and use IdentityServer to do so!
Oh, also — we have stickers :)
Hope to see you there.
Demos — NDC Oslo, 2015
Here are the slides and demos from my session at NDC Oslo 2015 on securing JavaScript based apps:
And now the video is live:
Thanks!
Demos — SDD, May 2015
Here are the slides and demos from my two sessions at SDD 2015 in London (ASP.NET5 & MVC6 and Threats and Mitigation):
Enjoy.
makecert and creating ssl or signing certificates
I’ve been asked to post my makecert scripts for creating self-signed certificates (one for SSL and the other for signing). I use both of these scripts as .bat files. These scripts accept one parameter — the CN (common name) you want the certificate to match. For the SSL cert this must match the host name. For signing it’s just a unique name. Both of these need to be run from an administrative command prompt because the scripts install the certificate into the local machine’s personal certificate store. If you need the public key portion (.cer) then you’d have to open mmc and export it. Also, notice the expiration in the scripts — this is something you might want to change based upon your situation.
The first script is for creating SSL certificates. This is good for setting up SSL on your local IIS for a new web site (you’d need to ensure the host is indicated and SNI is configured). Although the SSL certificate won’t be trusted until you configure the cert as trusted on the client machine. Here are the .bat file contents:
makecert -r -pe -n "CN=%1" -b 01/01/2015 -e 01/01/2020 -sky exchange -a sha256 -len 2048 -ss my -sr localMachine
The second script is for creating signing certificates (for things like token signing within a token service such as IdentityServer). Here are the .bat file contents:
makecert -r -pe -n "CN=%1" -b 01/01/2015 -e 01/01/2020 -sky signature -a sha256 -len 2048 -ss my -sr LocalMachine
Or if you simply want these to save the certificate files to the filesystem:
makecert -r -pe -n "CN=%1" -b 01/01/2017 -e 01/01/2025 -sky signature -a sha256 -len 2048 -sv %1.pfx %1.cer
HTH
Walk through videos for IdentityManager
I’ve recorded a couple of videos for getting started with IdentityManager. Enjoy!
Demos — Boston Code Camp 23, March 2015
Here are the slides and demos from my session at Boston CodeCamp 23 on securing modern JavaScript apps:
Thanks for attending!
Boston Code Camp 23, March 2015
I’ll be speaking at Boston Code Camp 23 this weekend in Cambridge, MA. I’ll be speaking about securing single-page style JavaScript applications with OpenID Connect and OAuth2.
Here’s the link to my session.
Hope to see you there.
IdentityServer3 1.0.0
After a lot of work, Dominick and I have released IdentityServer3. His post sums it up perfectly. And thanks to all of the feedback we’ve received.
Today is a big day for us! Brock and I started working on the next generation of IdentityServer over 14 months ago. In fact – I remember exactly how I created the very first file (constants.cs) somewhere in the Swiss Alps and was hunting for internet connection to do a check-in (much to the dislike of my family).
1690 commits later it is time to recap what we did, why we did it – and where we are now.
Having spent a considerable amount of time in the WS*/SAML world, it became more and more apparent that these technologies are not a good match for the modern types of applications that we (and our customers) like to build. These types of applications are pretty much a combination of web and native UIs combined with web APIs. Security protocols need to be API, HTTP and mobile friendly, and we need authentication…
View original post 706 more words
Demos — NDC London, 2014
Here are the slides and demos from my sessions at NDC London:
https://1drv.ms/f/s!AjXKCyy1XZYBjC6sGkGM6YN8-8wj
Also here are the various links that I mentioned:
And the videos are now posted:
Thanks to all who attended!
Demos — Boston Code Camp 22, November 2014
The code for my session at Boston Code Camp on OpenID Connect are posted on github:
Thinktecture IdentityServer v3
Thanks for coming!
Sliding and absolute expiration with cookie authentication middleware
The Katana cookie authentication middleware supports either a sliding or an absolute expiration, but not both. Recently a client was interested in having both, so I decided to figure out how this could be done.
It’s quite easy since the cookie authentication middleware allows for a Provider property where you can handle events for interesting activity in the middleware. The two events that I used were the OnResponseSignIn which is raised right before the outgoing cookie is issued, and OnValidateIdentity which is raised when the incoming cookie is being validated.
In OnResponseSignIn I add the absolute expiration to the issued cookie. I did not do this as a claim, but rather in the Properties of the cookie (which contains a dictionary for arbitrary values). Then in the OnValidateIdentity I simply read the value back from the dictionary in the Properties to check the expiration. To then cause the cookie to be ignored the RejectIdentity API is used. Since the cookie is dead, you can then optionally call SignOut to have the cookie revoked.
Here’s the code:
public void Configuration(IAppBuilder app)
{
    app.UseCookieAuthentication(new CookieAuthenticationOptions
    {
        AuthenticationType = "Cookie",
        ExpireTimeSpan = TimeSpan.FromHours(1),
        SlidingExpiration = true,
        Provider = new CookieAuthenticationProvider{
            OnResponseSignIn = ctx => {
                var ticks = ctx.Options.SystemClock.UtcNow.AddHours(10).UtcTicks;
                ctx.Properties.Dictionary.Add("absolute", ticks.ToString());
            },
            OnValidateIdentity = ctx =>
            {
                bool reject = true;
                string value;
                if (ctx.Properties.Dictionary.TryGetValue("absolute", out value))
                {
                    long ticks;
                    if (Int64.TryParse(value, out ticks))
                    {
                        reject = ctx.Options.SystemClock.UtcNow.UtcTicks > ticks;
                    }
                }

                if (reject)
                {
                    ctx.RejectIdentity();
                    // optionally clear cookie
                    //ctx.OwinContext.Authentication.SignOut(ctx.Options.AuthenticationType);
                }

                return Task.FromResult(0);
            }
        }
    });
}
HTH
NDC London, 2014
I’ll be speaking at NDC London this December, 2014. I have two sessions on Thursday on ASP.NET Identity and a 2-day precon workshop with Dominick on identity, single sign-on, federation, authorization, web apis and all the usual acronyms. :)
Hope to see you there.
Boston Code Camp 22, November 2014
I’ll be speaking at Boston Code Camp 22 this November 22nd, 2014 in Cambridge, MA. I’ll be speaking about Single Sign-on with OpenID Connect and API authorization using OAuth2. And of course, I’ll be showing off IdentityServer v3 in the process :)
Here’s the link to my session.
Hope to see you there.
base64url encoding
It’s often more convenient to manage data in text format rather than binary data (for example a string column in a database, or a string rendered into a HTTP response). Common examples in security are digital signatures and encryption. Signing and encrypting typically produce bytes of data and in a web application sometimes it’s just easier to manage that data as text.
Base64 is a useful tool for doing this encoding. The only problem is that base64 encoding uses characters that do not work well in URLs and sometimes HTTP headers (e.g. the +, / and = characters are either reserved or have special meaning in URLs). URL encoding is designed to address that problem, but it’s sometimes error prone (e.g. double encoding) or the tooling just doesn’t do the right thing (IIS decodes %2F into a / before it arrives into the application and thus confuses the ASP.NET routing framework). It is very useful to put these sorts of values in a URL, but it’s also frustrating that it’s problematic and that we have to work around these issues again and again.
While reading the JWT specs they faced the same problem and they addressed it by using base64url encoding (which is almost the same, yet different than base64 encoding). Base64url encoding is basically base64 encoding except they use non-reserved URL characters (e.g. – is used instead of + and _ is used instead of /) and they omit the padding characters. I’ve been using this for some time now and am quite happy with it as a replacement for base64 encoding.
Unfortunately there’s no implementation (that I know of) in the .NET framework for this, so we’ve built our own in our Thinktecture.IdentityModel security helper library. You can use our helpers by using the NuGet, or you can grab the code from here, or you can just copy from the snippet below.
public static class Base64Url
{
    public static string Encode(byte[] arg)
    {
        string s = Convert.ToBase64String(arg); // Standard base64 encoder

        s = s.Split('=')[0]; // Remove any trailing '='s
        s = s.Replace('+', '-'); // 62nd char of encoding
        s = s.Replace('/', '_'); // 63rd char of encoding

        return s;
    }

    public static byte[] Decode(string arg)
    {
        string s = arg;
        s = s.Replace('-', '+'); // 62nd char of encoding
        s = s.Replace('_', '/'); // 63rd char of encoding

        switch (s.Length % 4) // Pad with trailing '='s
        {
            case 0: break; // No pad chars in this case
            case 2: s += "=="; break; // Two pad chars
            case 3: s += "="; break; // One pad char
            default: throw new Exception("Illegal base64url string!");
        }

        return Convert.FromBase64String(s); // Standard base64 decoder
    }
}
Edit: Turns out there are two places in .NET where this sort of functionality is available: 1) ASP.NET’s HttpServerUtility.UrlTokenEncode, and 2) Katana’s Microsoft.Owin.Security assembly with the Base64UrlTextEncoder class.
Boston .NET Architecture Group, October 2014
Very last minute, but I’ll be speaking at the Boston .NET Architecture Group tonight (October 15th, 2014) at 6pm. The topic is “Unifying Authentication and Authorization with OpenID Connect and Thinktecture IdentityServer v3“.
Hope to see you there.
Demos — IT/DevConnections 2014
Here are the demos from my sessions at IT/DevConnections 2014:
Thanks to everyone that attended!
Thinktecture IdentityManager beta 1
Dominick and I have been quite busy on IdentityServer v3 as well as IdentityManager. We’re making good progress and this post is to announce beta 1 of IdentityManager.
A brief recap of what IdentityManager is all about:
IdentityManager is a tool for developers and/or administrators to manage the identity information for users of their applications. This includes creating users, editing user information (passwords, email, claims, etc.) and deleting users. It provides a modern replacement for the ASP.NET WebSite Administration tool that used to be built into Visual Studio.
Some features that IdentityManager provides:
- A browser based user interface as well as a RESTful API for managing user identity data
- Allows creating, deleting, and managing user identity data
- Claims as well as strongly typed properties are supported
- Allows managing role definitions
- Special support for MembershipReboot and ASP.NET Identity identity management systems
- Extensible API to allow for additional identity management systems such as ActiveDirectory, WAAD, LDAP and/or ASP.NET Membership (if you’re interesting in contributing, this would be a great area to help out with!)
- Designed as OWIN middleware to allow for flexible hosting
- Security model to authorize local users or users from an external OAuth2 authorization server
- Open source (BSD3)
Here are some updated screen shots:
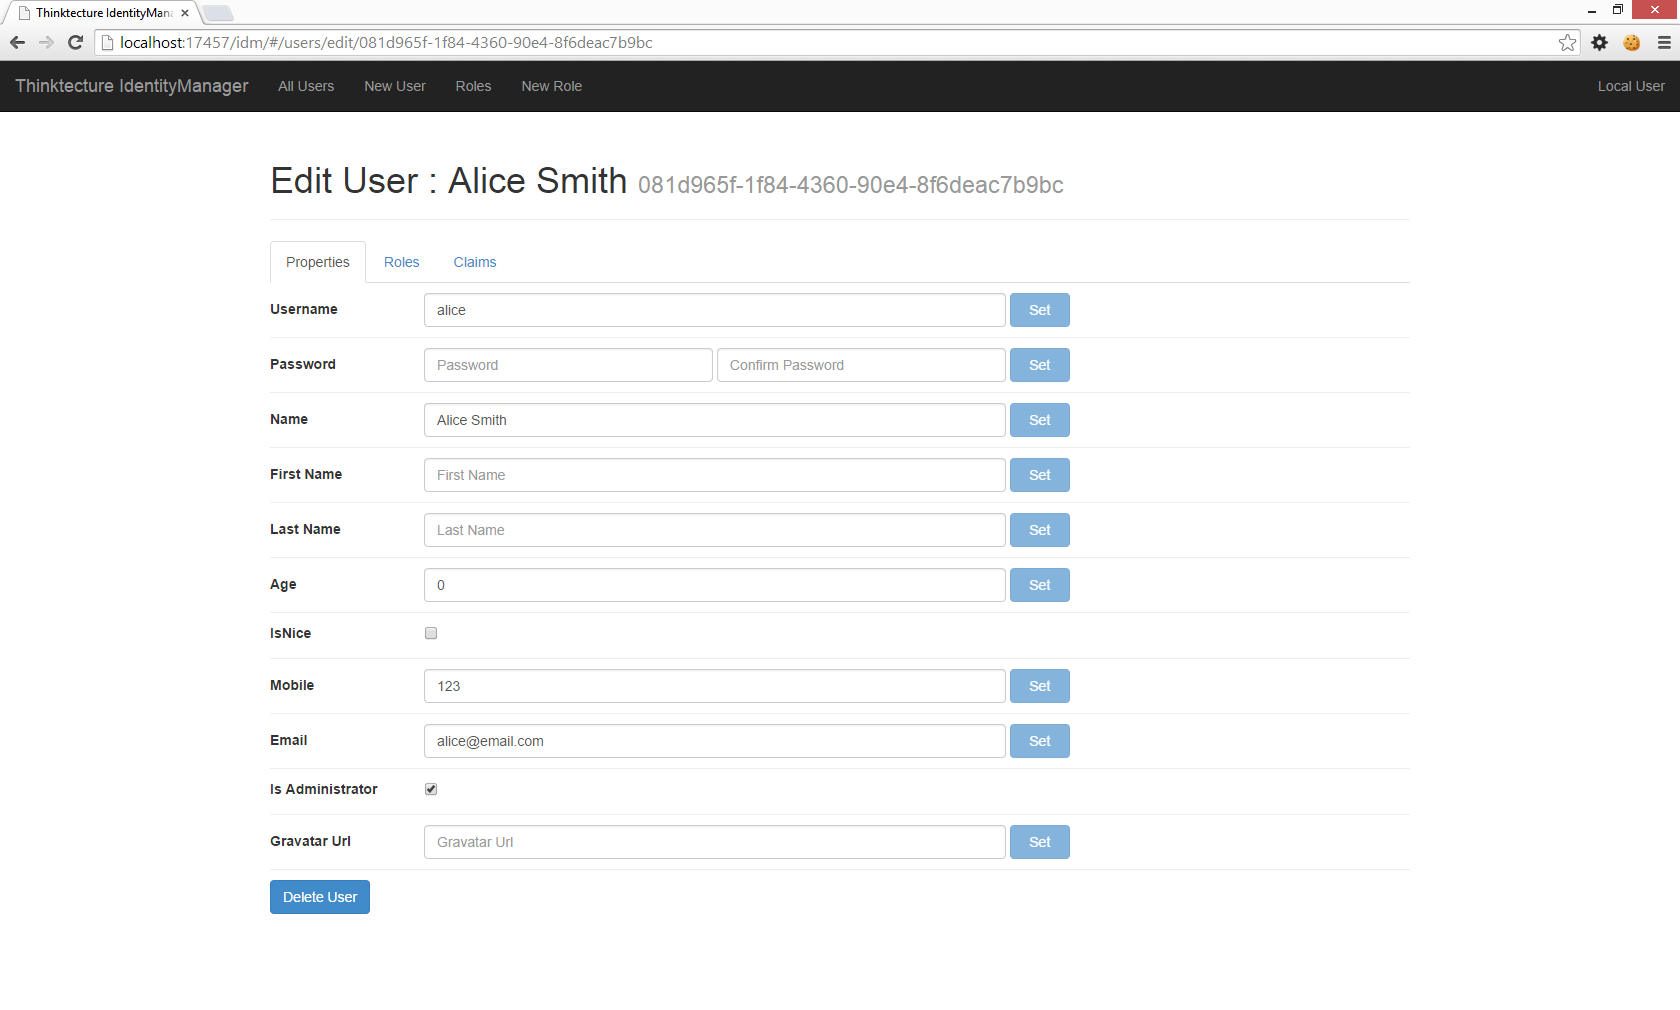
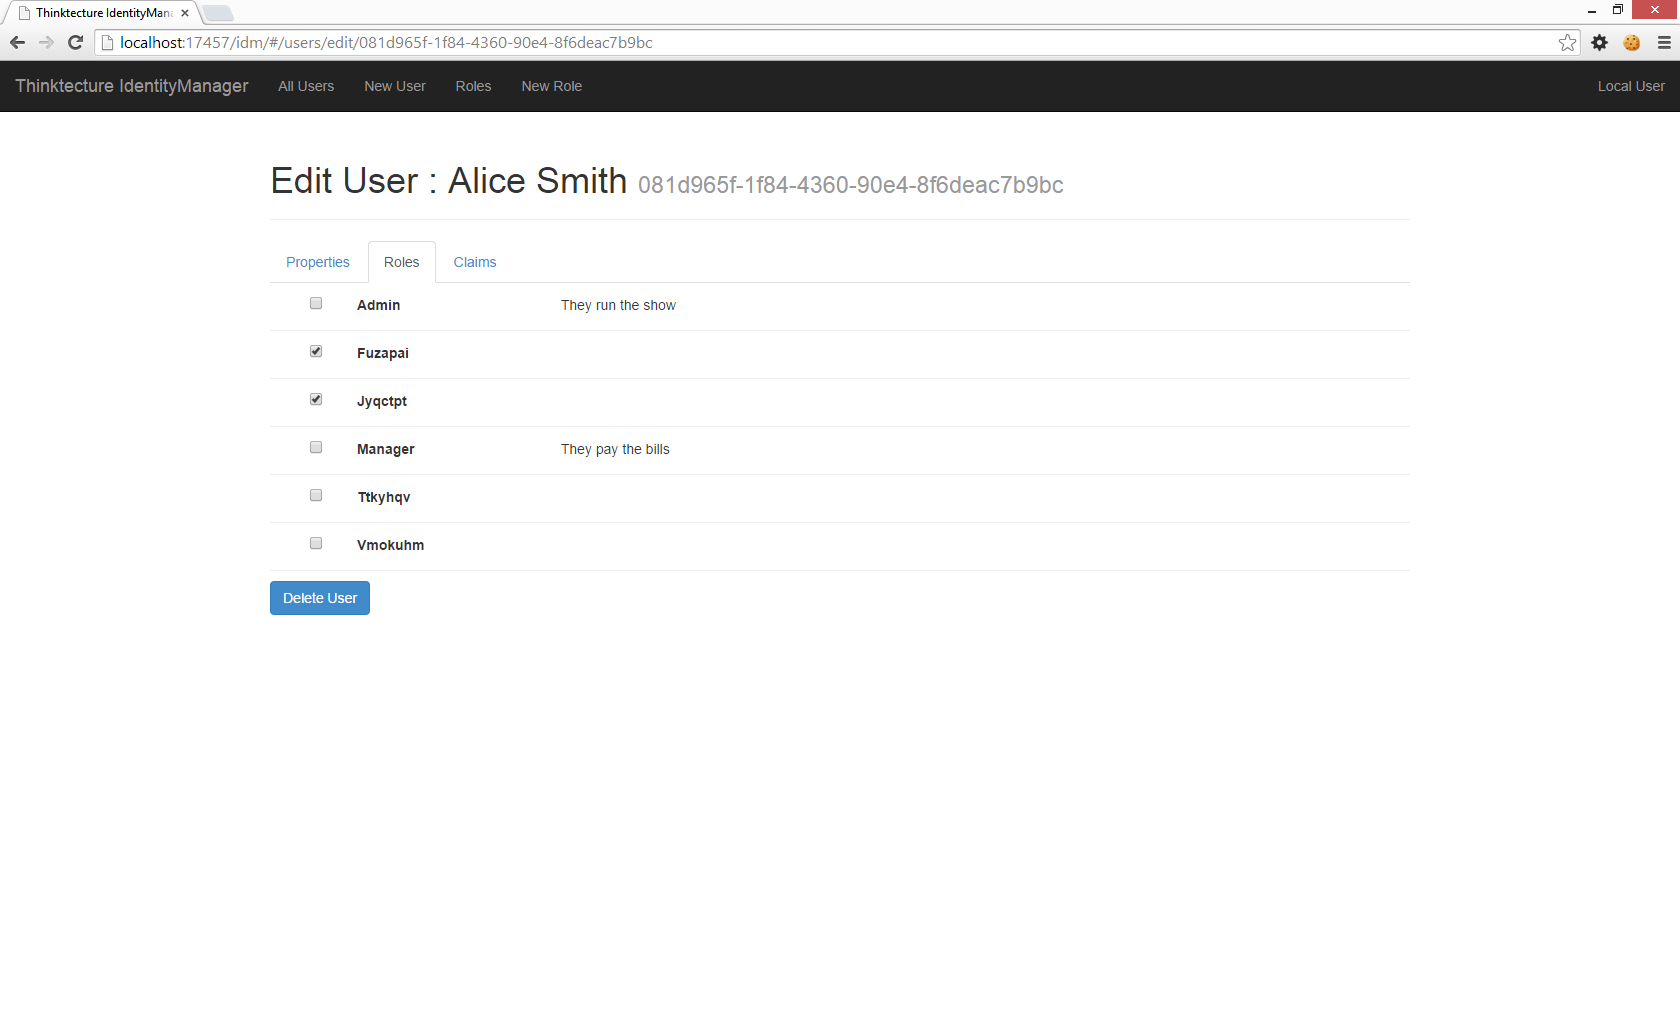


Feel free to check out the documentation, the code, and please provide feedback. Thanks.
IT/DevConnections 2014
I will be speaking at IT/DevConnections in September, 2014 in Las Vegas. Here is the link to my sessions. They include:
- OWIN and Katana: The New HTTP Host for .NET Web Applications
- Securing ASP.NET Web API with OAuth2
- Identity Management in ASP.NET
Additionally I will be doing a full day workshop on Identity and Access Control for Modern Applications.
Hope to see you there.
Demos — NDC Oslo, 2014
Here is the link for the slides and demos for my session on OWIN and Katana at NDC Oslo, 2014:
Thanks for attending!
Edit: The video is also posted here:
NDC Oslo, 2014
Demos — Software Design & Development Conference
Here are the slides and demos from my sessions at SDD 2014 in London.
Thanks to everyone that attended, and thanks to Nick for having me.
Software Design & Development Conference
Wow, I forgot to make post on this — sorry!
Next week (week of May 19th, 2014) I’ll be speaking at the Software Design & Development Conference in London. I have several sessions on security and web development. Also, Dominick and I have a day-long post-con workshop on Identity and Access Control. Hope to see you there!
Introducing Thinktecture IdentityManager
Back in 2005 when Microsoft released the ASP.NET MembershipProvider API, they also included in Visual Studio the ASP.NET WebSite Administration tool. This was used by developers to quickly create and edit users to populate the MembershipProvider database. Given Microsoft’s move away from Membership, this tool was removed from Visual Studio and many developers have missed it. In a similar vein, ever since I built MembershipReboot I’ve been meaning to provide an admin tool to allow similar functionality that was in the ASP.NET WebSite Administration tool. Well, I finally got around to building said tool — introducing Thinktecture IdentityManager. IdentityManager is developed as OWIN middleware and can easily be hosted in any OWIN host. Also given the recent release and popularity of ASP.NET Identity, I designed it to support both MembershipReboot and ASP.NET Identity. It’s very early in its development, but this first preview version is intended to allow developers or administrators to create users, change password, email, phone and claims. Also, you can query the entire database and filter for the user’s user name or name claim (display name). I plan to also add role management support and more self-service identity management features. Also, I will be working on a strategy for securing IdentityManager so it can be used in scenarios beyond just development. Below are some screen shots. Home page:  Searching/browsing users:
  Editing a user:
  The code that’s needed to host IdentityManager looks something like this:
public void Configuration(IAppBuilder app)
{
    app.UseIdentityManager(new IdentityManagerConfiguration()
    {
        UserManagerFactory = Thinktecture.IdentityManager.MembershipReboot.UserManagerFactory.Create
    });
}
As you can tell, it’s fairly simple in terms of the current features and the setup. I’ll write another post with more details on customizing the configuration of the identity libraries. In the meantime, the code for IdentityManager is open source and available on github. There is also a short video showing the features and configuration. Feedback welcome via the github issue tracker.
How I made EF work more like an object database
I’m not a DB guru, so EF is usually very helpful for me. I like EF’s ORM capabilities, as this is quite a natural desire to want to map a set of in-memory objects to a database. This is all good, except when EF is a relational snob and I am an ignorant object-oriented programmer. The issue I refer to is that of “child orphans” in EF/DB speak.
The setup is this: I have a parent table/entity (let’s call it Person) and I have a child table/entity (let’s call it Pet). In my object oriented mindset a pet only exists in the context of a person – in other words you have to have a parent person object to have a pet (I don’t do strays a la Sochi).
public class Person
{
    public virtual int ID { get; set; }
    public virtual string Name { get; set; }
    public virtual ICollection<Pet> Pets { get; set; }
}

public class Pet
{
    public virtual int ID { get; set; }
    public virtual int PersonID { get; set; }
    public virtual string Name { get; set; }
}
And as you can tell from my object model, I didn’t want to fall into the normal EF code first style where child entities had navigation properties to their containing entity – that feels wrong to me (but I understand the need for a foreign key once mapped to the DB, thus the PersonID).
Anyway, to map this to the database I have a DbContext with a DbSet<Person>. I override OnModelCreating to overcome my lack of the navigation property I mentioned above:
public class PersonDatabase : DbContext
{
    public DbSet<Person> People { get; set; }

    protected override void OnModelCreating(DbModelBuilder modelBuilder)
    {
        modelBuilder.Entity<Person>().HasKey(x => x.ID);
        modelBuilder.Entity<Pet>().HasKey(x=>x.ID);
        modelBuilder.Entity<Person>().HasMany(x => x.Pets)
            .WithRequired().HasForeignKey(x => x.PersonID).WillCascadeOnDelete();
    }
}
And here’s an example of inserting into both tables:
using (var db = new PersonDatabase())
{
    var brock = db.People.Create();
    brock.Name = "Brock";
    var dog = new Pet();
    dog.Name = "Roo";
    brock.Pets.Add(dog);

    db.People.Add(brock);
    db.SaveChanges();
}
So notice no DbSet<Pet> is needed with EF in the DbContext. EF recognizes the relationship and will happily map any Pet in the Pets collection to a Pet table. I find this quite nice of EF and it plays right into my OO mindset. So naturally (or so I assumed) I thought I could remove a Pet from the collection of a Person and the Pet would be deleted from the table:
using (var db = new PersonDatabase())
{
    var brock = db.People.Single(x => x.Name == "brock");
    var roo = brock.Pets.Single(x => x.Name == "Roo");
    brock.Pets.Remove(roo);
    db.SaveChanges();
}
Not so. You get the exception:
Unhandled Exception: System.InvalidOperationException: The operation failed: The relationship could not be changed because one or more of the foreign-key properties is non-nullable. When a change is made to a relationship, the related foreign-key property is set to a null value. If the foreign-key does not support null values, a new relationship must be defined, the foreign-key property must be assigned another non-null value, or the unrelated object must be deleted.
It turns out that EF stops being about object relational mapping and decides to be a relational snob at this point. I am happy conceding that it’s right and knows more than me, but I just want my child row to be deleted. I don’t want to change my object model to support null FKs (since that’s not a correct mapping of my model). Also I’m quite confused because EF was kind enough to discern the Pets collection in Person it knew to automatically create the Pet table and inset rows when I added them to Person, but it doesn’t know to delete them when I remove them from the Person (especially when the foreign key is not null – I did that on purpose!). So I have a slight complaint that the behavior for adding doesn’t parallel the behavior for removing. Anyway, it knows best (I guess).
Turns out this behavior is nothing new and here’s the explanation: http://blog.oneunicorn.com/2012/06/02/deleting-orphans-with-entity-framework/
I was unsatisfied with this solution as it didn’t allow me to maintain my OO mindset when it came to EF (recall: it’s an object relational mapper). To solve my problem, I needed to be even more explicit (or deliberate) and use some interesting hooks in EF to tell it what I wanted it to do. It turns out there are enough events to let you know when an item is being removed from a collection, and in those event handlers you can mark and item as being removed to get the delete semantics I was looking for.
Here’s the insane code:
public class PersonDatabase : DbContext
{
    public PersonDatabase()
    {
        this.Set<Person>().Local.CollectionChanged +=
            delegate(object sender, NotifyCollectionChangedEventArgs e)
            {
                if (e.Action == NotifyCollectionChangedAction.Add)
                {
                    foreach (Person person in e.NewItems)
                    {
                        var entities = person.Pets as EntityCollection<Pet>;
                        if (entities != null)
                        {
                            entities.AssociationChanged +=
                                delegate(object sender2, CollectionChangeEventArgs e2)
                                {
                                    if (e2.Action == CollectionChangeAction.Remove)
                                    {
                                        var entity = e2.Element as Pet;
                                        if (entity != null)
                                        {
                                            this.Entry<Pet>(entity).State = EntityState.Deleted;
                                        }
                                    }
                                };
                        }
                    }
                }
            };
    }
}
So I read this as: any time a Person is materialized into the DbContext (either via inserting or loading) wire up to the Pets collection foreign key events. If that foreign key event is to remove the foreign key, then I want to remove the entity from the DB (which is the Pet). This gives me my OO semantics in a relational world. Too bad this isn’t easier in EF.
HTH
LIDNUG — Katana Authentication Middleware
Slides and demos from my recent LIDNUG session on Katana Authentication Middleware are here:
Recording is here:
TBD
During my presentation I ran into an issue where my external provider cookie wasn’t being issued. In retrospect this was a noob mistake, but what had happened was that the google authentication middleware was registered prior to the cookie middleware in the Katana pipeline. The google middleware was trying to issue the cookie the cookie middleware had not yet be activated in the pipeline, and thus wasn’t issuing being invoked to issue the cookie. Sorry — I should have known better, but it makes for a good learning point!
Thanks.
Demos — VS Live/Web Dev Live Las Vegas 2014
Here are the slides and demos from my sessions at VS Live in Vegas.
Thanks to everyone that attended, and thanks to the organizers at VS Live for having me.
LIDNUG — Intro to OWIN and Katana
Here are the slides and demos from my talk on OWIN and Katana at the LIDNUG:
Also, here’s the talk itself:
https://www.youtube.com/watch?v=DRPVO3-W4Rs&feature=c4-overview&list=UU-DCjVla8pR4tbHpen8dUsQ
Thanks.
Introducing IdentityReboot
I’ve been a vocal critic of the Microsoft identity solutions. In their defense this is not a trivial subject, but I feel that they’ve not really spent the time or focus they need to to provide a fully robust solution given the putative standards for modern security. ASP.NET Identity v2 is the latest iteration in the history of their implementations, and while it’s the best so far I feel there are still major issues with the security of the implementation.
I’ve also been touting MembershipReboot as an alternative, but I have realized several issues related to its visibility and adoption. MembershipReboot is a fairly small open source project. It’s a completely different library than the one(s) from Microsoft. I’m the only main developer. I am not paid to work on it. I do not have a staff. I only have the barest of documentation (I know — shame on me). The only real support is via the github issue tracker. And perhaps most importantly it’s hard to gain notice amid the marketing behemoth that is Microsoft. Notice in this very recent video there is no mention of how passwords are stored or how their library actually provides any security; rather topics such as EF and Azure are discussed *rolls eyes*. So, I completely understand that many won’t consider or even notice MembershipReboot and will adopt ASP.NET Identity without knowing any better.
IdentityReboot
Despite this I’m still doing my best to make this space better. As such, I’m announcing IdentityReboot.
IdentityReboot is a set of extensions to ASP.NET Identity that implement the major missing features I’ve complained about (put up or shut up, right?). The code to do this is essentially the same code I have already implemented in MembershipReboot, but it’s been adapted to the ASP.NET Identity programming model. The master branch targets ASP.NET Identity v2, but there is a v1 branch for ASP.NET Identity v1.
The main features provided by IdentityReboot (targeting v2) are:
- Per-account adaptive password hashing (as discussed here)
- Login and two factor authentication code brute force prevention (as discussed here)
- Fix the issue with the time-based two factor authentication codes (as discussed here)
The various components provided are:
AdaptivePasswordHasher
The password hashing algorithm is pluggable in ASP.NET Identity, so IdentityReboot provides an AdaptivePasswordHasher class that implements the password stretching I described here.
The AdaptivePasswordHasher constructor allows a developer to indicate the number of iterations to use. If the iterations are not provided then it uses the year-based adaptive algorithm. It can then be configured on the UserManager.PasswordHasher property and it will be used when password hashing is needed by the UserManager.
The iteration count is stored in the hashed password string itself so there’s no schema change needed. Also the AdaptivePasswordHasher is compatible with passwords already hashed and persisted with the built-in password hasher from ASP.NET Identity. This means you can add this and your existing users hashed passwords will still work.
IdentityRebootUserManager
To implement brute force prevention for passwords and two factor codes, the logic from the ASP.NET Identity UserManager had to be replaced. To do this, IdentityReboot provides a UserManager-derived class called IdentityRebootUserManager.
IdentityRebootUserManager overrides the methods that perform password and two factor authentication code validation. If too many invalid attempts have been made within a window of time, then these validation methods fail not allowing the user to proceed. These values are configurable, but default to 5 attempts within 5 minutes.
To implement this brute force prevention, some data needs to be stored in the database. As such, a new store interface was introduced to persist the necessary data: IBruteForcePreventionStore. This interface models storage for the last date/time of the failed login and the number of failed attempts. This store interface pattern is consistent with ASP.NET Identity’s pattern to allow any storage implementation.
Also, by default, the IdentityRebootUserManager automatically configures and uses the AdaptivePasswordHasher mentioned above.
MobileStoredTwoFactorCodeProvider
To fix the issue with time-based two factor authentication codes, IdentityReboot provides a new token provider class called MobileStoredTwoFactorCodeProvider. This token provider is meant to replace those built-in with ASP.NET Identity and improves upon the time-based providers by generating a code that is valid for a window of time from the time it is generated (as opposed to fixed windows of time, as I describe here).
To achieve this, the MobileStoredTwoFactorCodeProvider creates a random code which is sent via SMS to the user. This code is also hashed and stored in the database along with the time the code was generated. The hash is necessary to thwart attackers that have access to the database. The time is used to ensure the user has a sufficient window in which to validate the token. The number of digits and the validity duration are both configurable, and default to 6 digits and a 5 minute window.
To store the pertinent data for the MobileStoredTwoFactorCodeProvider another new store interface was defined: ITwoFactorCodeStore. It models persisting the hashed two factor authentication code and the date/time it was issued.
IdentityReboot.Ef
Finally, there is also an IdentityReboot.Ef project that provides an EF-backed IdentityRebootUserStore that implements the two additional store interfaces and an IdentityRebootUser class which defines the properties needed for the new store interfaces.
Getting Started
To use IdentityReboot, you can either get started from the samples or you can create a new empty ASP.NET application and then add the “Microsoft ASP.NET Identity Samples” from the nightly builds (as documented here). There are also packages on NuGet here and here.
In your web project starting from the templates all that is needed is to reference the IdentityReboot assemblies and then make these changes:
- Change ApplicationUser to derive from IdentityRebootUser instead of IdentityUser (in ~/Models/IdentityModels.cs)
- Replace new UserStore with new IdentityRebootUserStore (2 locations in ~/App_Start/IdentityConfig.cs)
- Change ApplicationUserManager to derive from IdentityRebootUserManager instead of UserManager (in ~/App_Start/IdentityConfig.cs)
- Remove the two calls to RegisterTwoFactorProvider and replace them by registering the MobileStoredTwoFactorCodeProvider.
If you have an existing database then you will need to use EF migrations to update the database with the new schema for the new stored data.
The intent with IdentityReboot was to enhance the security of ASP.NET Identity with as few changes and disruptions as possible. Again, all of these are illustrated in the samples.
Feedback welcome.
Concerns with two factor authentication in ASP.NET Identity v2
I’ve been doing a bit of research into how ASP.NET Identity v2 is implementing its new features, specifically two factor authentication. I was curious, of course, because I’ve had the opportunity to implement the same feature in MembershipReboot. It’s interesting to see the differences, and as you might have realized (due to this blog post) I have some concerns with the approach Microsoft has taken (which I list below).
Note that ASP.NET Identity v2 is not yet released and this post is based upon the publicly available nightly builds.
Brute force attacks on two factor authentication confirmations
I’ve already commented on this issue here, but I list it here for completeness.
Email used as a second factor for authentication
In the new sample template application for ASP.NET Identity, there are two different delivery mechanisms configured for two factor authentication — one via SMS to the user’s mobile phone (which is a very common and expected approach) and another via email to the user’s registered email account. Using email as an option for two factor authentication surprised me, since I always understood two factor authentication to mean that a user must present two factors from something you have (e.g. key), know (e.g. password), or are (e.g. biometrics). Using the user’s email as a second factor does not achieve two factor authentication (at least according to the strict definition) and if you think I’m splitting hairs, then let me instead illustrate an attack against the email as the second factor.
Imagine an attacker compromises the user’s email (perhaps difficult, but it still happens frequently). Once the attacker has done this, then of course they are in a position to intercept the email based two factor authentication token. But in addition, the user’s password is also essentially compromised because the attacker can issue a password reset which is confirmed via the user’s email (this also illustrates why an identity management system should support password reset secret questions and answers). So controlling the user’s email thwarts both password and two factor authentication code.
If the user’s mobile phone is used instead as the second factor, then even if the user’s email is compromised the attacker would also need to compromise the user’s mobile phone to gain access to the application. This is the point of two factor authentication — it requires more effort of the attacker. Using the email just doesn’t seem very strong to me. I’d suggest disabling the email based two factor authentication and just utilize the mobile phone delivery mechanism.
Time-based two factor authentication codes
For the two factor authentication codes, ASP.NET Identity uses RFC6238 to generate these values (it’s ok, I had to look it up as well). Basically the way this works is that a code can be determined based upon the clock time (given various inputs to seed the algorithm). A code will remain the same for some configurable duration (say for a 5 minute window of time). This window of time is based upon the server clock time and not the time the code was requested. So this means (for a 5 minute window) from 2pm to 2:05pm the code will be a consistent value, but as soon as the clock hits 2:05pm the code will be different but won’t change again until 2:10pm. It’s a clever idea and is similar to how those RSA key chain code generators work.
Update: Scott left a comment below with details about TOTP I wasn’t aware of. It seems that the algorithm allows for old codes up to a certain threshold and it looks like ASP.NET Identity allows for 90 seconds. This means that the usability window for code is much more user friendly than I realized. This allays my concern with this aspect of the two factor auth codes and ASP.NET Identity, but I still feel the next issue is a problem (see below). My apologies to ASP.NET Identity for my misunderstanding and mischaracterization of the TOTP implementation.
My complaint about this approach for two factor authentication codes is that the user doesn’t have any insight into when the window of time expires (whereas they do for the RSA key chain code generators). For example, a user logs into the application at 2:04pm and the code for that window of time is sent via SMS to their mobile device. This means that the user only has 1 minute from the time the server sends the SMS, to receive the SMS, unlock their phone, open their text messages and then enter the code into the web application to prove control of their phone. There will be a certain percentage of users (those those login closer to the end of the window of time) that will not be able to enter their code in time before it changes. And there’s no way for the user to understand that the code they’ve just entered is stale. Oh and the other issue is that the window of time that ASP.NET Identity uses isn’t as gracious as 5 minutes — rather it’s 30 seconds. That’s a very narrow window of time before the code expires.
Even if this window is expanded to 5 minutes (which is the expiration of the short-lived cookie as described here), that still means that on average 10% of users will be issued codes with less than 30 seconds to enter them. I can only imagine the questions on the ASP.NET forums asking why sometimes two factor codes work and why sometimes they don’t. Also, I could see how this might become an application support headache.
I can only surmise why this was done, but my guess is that ASP.NET Identity took this approach so they would not have to store anything in the database for the two factor authentication code. It’s a tradeoff, but unfortunately I think this is the wrong tradeoff since it makes the developer’s job easier at the expense of user friendliness.
Two factor authentication code generation and all your database are belong to us
So recall how we should be storing passwords — the premise is that an attacker has pwnd your database. This means anything in your database the attacker has. Well, it turns out that the “various inputs to seed the algorithm” that I mention above for the time-based two factor authentication code generation are all either well known constant values or plaintext values from the user’s record in the database. This means if the attacker has access to the user’s record in the database they can calculate the exact same two factor authentication code that ASP.NET Identity generates. This also doesn’t seem very strong to me.
I know there are better approaches (since I built at least one in MembershipReboot), but the tradeoff was that some storage was required in the server. I think that’s an acceptable tradeoff for better security.
How MembershipReboot mitigates login and two factor authentication brute force attacks
Login Brute Force Attacks
A complete security solution involves prevention, detection, and reaction. This means that you need to protect what’s sensitive in your system, but that’s not sufficient. You also need to actively monitor for attacks on the system and when you detect an attack you need to react to mitigate the attack. Schneier would be proud of me for saying so.
This basic tenet for building security solutions should apply when building an identity management solution. It’s not hard at all for an attacker to build tooling to mount an automated attack on the login page for a web application. And so how many of you write code to detect this scenario, let alone react to it? Well, I’d argue you shouldn’t have to. My contention is that this should be an obvious feature provided by any identity management library.
What is sensitive are the users’ passwords, and what is needed is a detection and mitigation approach for an attacker attempting to brute force a user’s password by repeated guessing against an application’s login page (which is different than the offline attacks I previously wrote about).
MembershipReboot does this — it keeps track of the number of failed login attempts as well as the last date/time the user failed to login. In its authentication logic, if the user attempts to login and the number of failed login attempts is above a reasonable threshold (which is configurable but defaults to 5) and is within a reasonable lockout duration (which is configurable but defaults to 5 minutes) then authentication fails (even if the credentials are correct). In short, after 5 failed login attempts within 5 minutes, MembeshipReboot locks the user out of their account. This is crucial for mitigating against these brute force attacks against the login page of an application.
Additionally, MembershipReboot (via it’s event bus architecture) raises an event to the application when an invalid login attempt was made and it passes the number of failed attempts. This allows an application to take further mitigation measures (e.g. blocking the user’s IP address) as deemed appropriate.
Unfortunately, nothing like this is provided in Microsoft’s current ASP.NET Identity solution (neither the detection, prevention nor notification) without deriving and replacing their security implementation. This means (by default) it’s wide open to such an attack.
Two Factor Authentication Brute Force Attacks
Another attack related to password brute force attacks is two factor authentication code brute force attacks. Some authentication systems support two factor authentication where after a user authenticates with a password, they then have to enter a code that is sent to their mobile phone. This is yet another point for attack, and as such, if the identity management solution supports two factor authentication then it should also mitigate against brute force attacks against the verification code.
MembershipReboot does this as well — it mitigates against this in two ways: 1) Once the user authenticates with a password the user is issued a short-lived authentication cookie (which is configurable but defaults to 5 minutes). This means the attacker only has 5 minutes to enter the mobile code before they must start over again. The other mitigation is 2) MembershipReboot uses the same tracking mechanism for codes that it uses for passwords as described above. This means that (by default) a user has 5 attempts to enter the verification code before they are locked out. This is crucial because two factor authentication codes have a much smaller search space than passwords (since they’re typically a numeric code with 5 or 6 digits).
Microsoft’s ASP.NET Identity does implement the short-lived authentication cookie, but it does not implement the brute force prevention for the code itself. In my rudimentary attack tests, I was able to attempt ~200K codes in the 5 minute window. If we assume my tests were in an ideal network, we can guesstimate that in a real network an attacker could make half of the attempts my test showed (so say ~100K). This is a 10% success rate, which just means an attacker needs to try a few more times and they’ll be able to compromise the account. This is less than ideal and far too high of a success rate for the default implementation and configuration.
How MembershipReboot stores passwords properly
I’m not going to go into all of the motivation behind proper password hashing — Troy’s done an excellent job of it and he has said it all better than I ever could have. The short version is that we assume that an attacker will eventually compromise the database and that we need to store passwords in a way to make it very hard for attackers to then extract the stored passwords. This leads to the modern approach to storing passwords which is done with a “password stretching” algorithm where you salt and hash in a loop for tens of thousands of iterations. The general consensus is that it should take about one second to compute a password hash. The number of iterations to arrive at one second is hardware dependent. One issue is that hardware gets better over time, so the number of iterations should adjust to account for that. A guideline to determine the iterations is that in the year 2000 an application should have used 1000 iterations and for each 2 years after the iteration count should be doubled. This means in 2012 we should have been using 64000 iterations and in 2014 we should be using 128000 iterations. As previously mentioned, this is hardware dependent and the real target is 500 to 1000 milliseconds. To help determine the right iterations for your hardware I have an utility here.
I really believe that this is the right approach to password storage. I also believe that if we can do a better job then we should (especially when it’s fairly easy to do). This was one of my motivations with MembershipReboot. I was upset that Microsoft wasn’t providing a modern implementation for password storage. Microsoft’s implementations are hard coded to use 1000 iterations. This is true *even* with their most recent identity management library “ASP.NET Identity”. This is a far cry from the current recommendations of tens of thousands of iterations.
Now, I must admit, Microsoft has opened the door slightly with ASP.NET Identity because the password hashing algorithm is configurable. This happens to be yet another complaint I have — Microsoft did not provide a configurable iteration count; they provided a configurable algorithm. While extensibility is good, this actually sucks because an application developer should not have to code this security infrastructure themselves from scratch. I think an application developer should only have to indicate the hashing iterations (overriding the paltry default of 1000).
This is what MembershipReboot does — it allows a developer using it to indicate the number of hashing iterations. If a number is not specified, the it uses the time-based iterations count described above (i.e. 64000 in 2012, 128000 in 2014, etc).
One last issue related to this is that this iteration count should be per-account. Think about it — a user “alice” who creates an account in 2012, say, should use the 64000 iteration count. But what if in 2014 the server hardware is upgraded. This means a new user, say “bob”, should use the higher iteration count of 128000. But if the iteration count is now 128000, then what happens when “alice” authenticates? Different users will need to use different iteration counts when authenticating. This then also means that the iteration count needs to be stored per-user and used when authenticating passwords.
This is what MembershipReboot does — it stores the iteration count used to hash the password along with the hashed password itself. This way a server can change its number of iterations over time and yet each user will authenticate with the iterations used at the time their password hash was calculated. And if a user ever changes their password, the current iteration value will be used.
And finally, MembershipReboot allows an application to require the user change their password periodically. This way user’s password can get updated with the current iteration count.
HTH
PS: One complaint about implementing an expensive password hashing operation is that this leaves your server open to a denial of service attack. If an attacker were to mount an automated attack against the login page of the application then the server would be bogged down in password hashing operations. Well, this needs to be prevented and I just wrote another post which describes why this prevention is necessary regardless of how passwords are being hashed.
Edit: More references:
Boston .NET Architecture Group
I’ll be speaking this Wednesday (Jan 15th) at 6pm at the Boston .NET Architecture Group. The topic will be “Securing Web API with OAuth2” and here’s the outline:
Traditional enterprise security protocols (such as Kerberos, SAML2 and WS-*) weren’t designed for the modern age of mobile and web applications. There are new suite of protocols and technologies that are designed for this modern age. In this very informal presentation, we will be speaking about these newer technologies such as OAuth2 and JSON web tokens and their approach for securing applications. As part of this discussion we will also look at Thinktecture AuthorizationServer, which is an open-source, full-fledged OAuth2 authorization server which can be used to issue tokens for securing your APIs.
Hope to see you there.
A primer on external login providers (social logins) with OWIN/Katana authentication middleware
Like MVC 4, in MVC 5 and Visual Studio 2013 we have the ability to use external login providers (aka social logins) in our ASP.NET applications. The big change related to this from the prior version is that we no longer are using DotNetOpenAuth and instead are now using OWIN authentication middleware to handle the the various protocols to these external providers. Unfortunately the templates in Visual Studio 2013 related to these external providers are quite complex and can be overwhelming (I know, because it took many *days* of debugging and using reflector to really understand how it all worked). Anyway, that’s the point of this post – an attempt to explain in the least amount of code how this external authentication middleware works in Katana. I already made a couple of other posts related to this (cookie middleware and active vs. passive middleware), so those are assumed knowledge.
Katana ships with a few pieces of middleware to allow an ASP.NET application authenticate with external identity providers (like Google, Facebook, Live, Twitter, etc.). The middleware encapsulates the various protocols used to achieve this authentication and that’s a convenient abstraction for an application developer, since there are lots of different protocols that might be used. But it helps to learn the mechanics of the middleware to understand how you’ll be configuring and using it in your code.
When your application wants to authenticate a user with an external provider you indicate this to the AuthenticationManager on the OwinContext. Your code calls Challenge passing the name of the authentication middleware you want to invoke (so “Google”, “Facebook”, etc.). Also, as part of the mechanics, the middleware won’t kick in unless the current HTTP response is a 401 status code. When the external provider middleware you’ve triggered sees the 401 response from your application, it initiates the protocol to the external provider. This usually involves various HTTP redirects to the external provider so the user can login. Here’s what that code might look like:
public ActionResult ExternalLogin(string provider)
{
    var ctx = Request.GetOwinContext();
    ctx.Authentication.Challenge(
        new AuthenticationProperties{
            RedirectUri = Url.Action("Callback", new { provider })
        },
        provider);
    return new HttpUnauthorizedResult();
}
The above code gets the OwinContext from the request. We call Challenge passing an AuthenticationProperties which allows us to indicate a return URL (more on that later), and then the name of the provider we want to use. And, as mentioned above, we need to return a 401 status code.
Presumably your application would give the user a hyperlink with the provider as a query string parameter into this method so the user can indicate which provider they want to use. To dynamically discover what providers your application has configured, look into the GetAuthenticationTypes API on the AuthenticationManager, perhaps something like this:
var ctx = Request.GetOwinContext();
var providers =
    from p in ctx.Authentication.GetAuthenticationTypes(d => !String.IsNullOrWhiteSpace(d.Caption))
    select new
    {
        name = p.Caption,
        url = Url.Action("ExternalLogin", new { provider = p.AuthenticationType })
    };
So after your application triggers the authentication middleware and the protocol is all done, then the middleware does two important things: 1) it issues an authentication cookie (typically called the “ExternalCookie”) representing the outcome of the authentication from the external provider (and this cookie contains all the claims from the external provider for the user), and 2) it redirects the browser back into your application to a URL you have provided (from the AuthenticationProperties above). In this redirect is your chance to examine the claims inside of the external cookie to know who the user is, and then it’s up to you what to do next. Your application could store all of this information in a database, and/or it could just log the user in with the normal cookie middleware based upon the claims from the external provider. It just depends on your authentication requirements. Here’s an example of what that callback might look like:
public ActionResult Callback(string provider)
{
    var ctx = Request.GetOwinContext();
    var result = ctx.Authentication.AuthenticateAsync("ExternalCookie").Result;
    ctx.Authentication.SignOut("ExternalCookie");

    var claims = result.Identity.Claims.ToList();
    claims.Add(new Claim(ClaimTypes.AuthenticationMethod, provider));

    var ci = new ClaimsIdentity(claims, "Cookie");
    ctx.Authentication.SignIn(ci);

    return Redirect("~/");
}
The above code calls back into the AuthenticationManager to obtain the identity of the user from the external cookie. Once we have that, we immediately revoke the cookie by calling SignOut. Next we get the claims for the external authentication (this is where you might store them in a database or load additional claims from a database to add to the logged in user’s claims). In my example here, I chose to augment the claims with an additional claim so I know which provider was used. We then use those claims to log the user into the app using the normal cookie middleware.
The only other thing to look at is how to configure the middleware. This is configured in your Katana startup code, as such:
public class Startup
{
    public void Configuration(IAppBuilder app)
    {
        // this is the normal cookie middleware
        app.UseCookieAuthentication(new CookieAuthenticationOptions
        {
            AuthenticationType = "Cookie",
            AuthenticationMode = Microsoft.Owin.Security.AuthenticationMode.Active,
        });

        // these two lines of code are needed if you are using any of the external authentication middleware
        app.Properties["Microsoft.Owin.Security.Constants.DefaultSignInAsAuthenticationType"] = "ExternalCookie";
        app.UseCookieAuthentication(new CookieAuthenticationOptions
        {
            AuthenticationType = "ExternalCookie",
            AuthenticationMode = Microsoft.Owin.Security.AuthenticationMode.Passive,
        });

        // these lines of code configure the various providers we want to use
        app.UseFacebookAuthentication(new FacebookAuthenticationOptions {
            AppId = "id", AppSecret = "secret"
        });
        app.UseGoogleAuthentication();
    }
}
The first section (lines 5-10) is the normal cookie middleware used for authenticating users (see my previous post on this).
The second section (lines 13-18) of code relates to the mechanics of the external provider middleware. Recall the external provider middleware needs to issue a cookie to represent the outcome of the external authentication — these two lines set that up. Line 13 assigns into the app.Properties the name of the cookie middleware to use. All the external authentication middleware look for this hard-coded name. Line 14 then configures that cookie middleware. In the templates in Visual Studio 2013 these two lines are hidden behind the UseExternalSignInCookie call in Startup.Auth.cs. An alternative would be to set on each external provider the SignInAsAuthenticationType property, which is the name of the cookie middleware to use.
Finally, the third section (lines 21-24) in the above code configures which external providers we want to use.
HTH
VS Live/Web Dev Live Las Vegas 2014
It seems I’ll be speaking at VS Live/Web Dev Live in Las Vegas on March 13th, 2014. My sessions will be:
- OWIN and Katana: The New HTTP Host for .NET Web Applications
- Internals of Security for Web Applications in Visual Studio 2013
- Identity Management in ASP.NET
Hope to see you there!
MembershipReboot v5 released
After many hours of work, I’m happy to say that I’ve released MembershipReboot v5. This release has some main points:
- Some minor vulnerabilities from v4 were fixed (and thus the implementation is more resilient to attacks)
- The repository and entity design was reworked significantly to allow an easier time with:
- defining custom entity properties/columns
- using a non-GUID primary key
- allowing for all the entity classes to be custom classes
- allowing for use of non-ORM backing store
- Better designed OWIN/Katana support
- There is now support for “password reset secrets”
- Added migrations into the EF project to migrate from v4 to v5
- A few other bug fixes here & there
Here’s the link to the release notes (tho they’re mainly just a wild list of changes). All the NuGets were updated to v5.
If you’re just getting started, then I’d suggest looking at the main sample.
Enjoy.
Demos — NDC London 2013
I had a great time at NDC London finally meeting so many people face-to-face. Many thanks to the organizers, attendees and other presenters.
I have posted the demos and slides for my two ASP.NET security sessions here.
I also mentioned I’d post links for the various sites I mentioned. Here they are (and if I forgot any, please let me kn0w):
Thanks!
MSDN article on CORS in Web API 2
My MSDN article on CORS in Web API is now out!
Given the nature of CORS, I really wanted to spend much of the article explaining CORS by itself. With that understanding then it’s simple enough to understand how Web API surfaces support for CORS.
Enjoy.
Owin and EF6 support in MembershipReboot
Today I did a new release of MembershipReboot and updated NuGet with the new code.
First, the NuGet package BrockAllen.MembershipReboot.Ef is now built against EF6.
Second: Two new NuGet packages were added: BrockAllen.MembershipReboot.WebHost and BrockAllen.MembershipReboot.Owin. These reflect the refactoring of the dependency on System.Web.
There was some helper code that used ASP.NET and the SAM for some cookie helpers, and this code has been moved into BrockAllen.MembershipReboot.WebHost. If you were previously using the AspNetApplicationInformation or SamAuthenticationService classes, you will need to reference the BrockAllen.MembershipReboot.WebHost NuGet package and include the BrockAllen.MembershipReboot.WebHost namespace.
If you’re using OWIN then you can now use the new BrockAllen.MembershipReboot.Owin package. There is also a Nancy sample in the samples on github.
Enjoy.
If you want to use cookie authentication middleware with a project that contains both ASP.NET code (WebForms or MVC) and Web API, then in the new Visual Studio 2013 you might notice some odd behavior when your Web API issues an unauthorized (401) HTTP response code. The assumption here is that the Web API code wants the authentication outcome from the cookie middleware, so you will not use SuppressDefaultHostAuthentication (for a little context see this post).
Normally when using cookie authentication middleware, when the server (MVC or WebForms) issues a 401, then the response is converted to a 302 redirect to the login page (as configured by the LoginPath on the CookieAuthenticationOptions). But when an Ajax call is made and the response is a 401, it would not make sense to return a 302 redirect to the login page. Instead you’d just expect the 401 response to be returned. Unfortunately this is not the behavior we get with the cookie middleware — the response is changed to a 200 status code with a JSON response body with a message:
{"Message":"Authorization has been denied for this request."}
I’m not sure what the requirement was for this feature. To alter it, you must take over control of the behavior when there is a 401 unauthorized response by configuring a CookieAuthenticationProvider on the cookie authentication middleware:
app.UseCookieAuthentication(new CookieAuthenticationOptions
{
   AuthenticationType = DefaultAuthenticationTypes.ApplicationCookie,
   LoginPath = new PathString("/Account/Login"),
   Provider = new CookieAuthenticationProvider
   {
      OnApplyRedirect = ctx =>
      {
         if (!IsAjaxRequest(ctx.Request))
         {
            ctx.Response.Redirect(ctx.RedirectUri);
         }
     }
   }
});
Notice it handles the OnApplyRedirect event. When the call is not an Ajax call, we redirect. Otherwise, we do nothing which allows the 401 to be returned to the caller.
The check for IsAjaxRequest is simply copied from a helper in the katana project:
private static bool IsAjaxRequest(IOwinRequest request)
{
   IReadableStringCollection query = request.Query;
   if ((query != null) && (query["X-Requested-With"] == "XMLHttpRequest"))
   {
      return true;
   }
   IHeaderDictionary headers = request.Headers;
   return ((headers != null) && (headers["X-Requested-With"] == "XMLHttpRequest"));
}
HTH
Host authentication and Web API with OWIN and active vs. passive authentication middleware
A quick note about Web API 2 security running in OWIN and a ASP.NET project (which you will see with the new templates in Visual Studio 2013). By default, Web API code running in a host will inherit the host’s authentication model. This means if the web application uses cookie authentication or windows authentication for the HTML portion of the application, then when Ajax calls are made from these web pages back to the server this same authentication will be passed along to calls into Web API.
RequestContext.Principal
Before I even get into the main part of this post, a side note on the identity of the calling user: Web API 2 introduced a new RequestContext class that contains a Principal property. This is now the proper location to look for the identity of the caller. This replaces the prior mechanisms of Thread.CurrentPrincipal and/or HttpContext.User. This is also what you would assign to if you are writing code to authenticate the caller in Web API.
SuppressDefaultHostAuthentication
While the MVC templates use a cookie based authentication mechanism, the new SPA templates prefer to use a token based authentication model explicitly passed via the Authorization HTTP header (which is better since it avoids CSRF attacks). This means that the default authentication from the host must be ignored since the authentication will be performed against something else other than a cookie. Web API 2 added a feature to ignore the host level authentication called SuppressDefaultHostAuthentication. This is an extension method on the HttpConfiguration that adds a message handler. The purpose of this message handler is to simply (and explicitly) assign an anonymous principal to the RequestContext’s Principal property. This way if cookie middleware does process an incoming cookie, by the time the call arrives at Web API the caller will be treated as anonymous.
Authentication filters
So then how will Web API code authenticate the caller? Well, in Web API 2 a new filter was added: AuthenticationFilter. This is a dedicated stage in the Web API pipeline for inspecting and authenticating the HTTP request. You can write your own, or you can use the new built-in HostAuthenticationFilter. The name of this new authentication filter sounds like a misnomer — we just suppressed the host authentication with with the SuppressDefaultHostAuthentication extension method — why are we now trying to authenticate form the host? Well, the HostAuthenticationFilter accepts a constructor parameter indicating which type of authentication we will use from the host. In the SPA templates they use one called “Bearer” (which is different than cookie).
The reason Web API is deferring back out to the host is because of the move to OWIN authentication middleware. OWIN authentication middleware is providing a generic and host independent framework for authentication. This same OWIN authentication middleware could also be used to authenticate calls into SignalR or Nancy. This makes more sense than Web API building their own custom authentication framework that would only work in Web API.
Active vs Passive authentication middleware
One question that arises — if the new templates have multiple OWIN authentication middleware configured, then which one is really used? Well, OWIN authentication middleware has the concept of passive vs. active. Active middleware always look at every incoming request and attempt to authenticate the call and if successful they create a principal that represents the current user and assign that principal to the hosting environment. Passive middleware, on the other hand, only inspects the request when asked to. In the case of the default templates from Visual Studio 2013, all the middleware configured are all passive by default, except for the “main” cookie authentication middleware (turns out there are two cookie middlewares that get used in some templates — the main one and another one for external identity providers and this other one is marked as passive).
All together now
So then in Web API when you use the HostAuthenticationFilter, you’re normally using it with a passive OWIN authentication middleware. When the authentication filter runs, it explicitly asks the OWIN authentication middleware to run and determine the identity of the caller. If successful, the result is populated into the RequestContext.Principal.
HTH
There have been many changes to how authentication is performed for web applications in Visual Studio 2013. For one, there’s a new “Change Authentication” wizard to configure the various ways an application can authenticate users. The approach to authentication that’s undergone the most changes in this version is local cookie-based authentication and external login providers based upon OAuth2 and OpenID (social logins). This style of logins is now collectively known as the “Individual User Accounts” and it’s one option in the new authentication wizard. This purpose of this post (and followup posts) is to explain the new authentication plumbing for this option.

OWIN authentication middleware
With .NET 4.5.1, for ASP.NET applications, all the underlying code that handles “Individual User Accounts” (as well as the templates in Visual Studio 2013) is new. This means for cookie based authentication we no longer use Forms authentication and for external identity providers we no longer use DotNetOpenAuth.
The replacement is a framework called OWIN authentication middleware and it’s targeting the OWIN API. I don’t plan to motivate OWIN here (this a good article on the subject), but in short it’s an abstraction API for the web host. Many frameworks such as Web API and SignalR (as well as other non-Microsoft frameworks) are coded to this abstraction so they do not require any particular web host (such as IIS).
So this OWIN authentication middleware is the new framework for authenticating users. The two main options we have is local authentication where the users enter credentials into the application itself, and external logins where the user is redirected to the various social login providers that are supported by Microsoft.
This post will only cover the cookie approach. Subsequent posts will describe the others.
OWIN cookie authentication middleware
Previously, for local authentication we used to use Forms authentication and its job was to issue a cookie to represent the current logged in user. Upon subsequent requests from the user, Forms authentication would validate the cookie and make a principal object available that represents the user’s identity.
Now, the new cookie-based implementation is called the OWIN cookie authentication middleware. This performs the same task — it can issue a cookie and then validates the cookie on subsequent requests. One improvement the OWIN cookie authentication middleware has over the previous Forms authentication is that it is claims-aware.
Another function of Forms authentication was that when the application issued a 401 unauthorized HTTP status code, Forms authentication would convert the response into a 302 redirect to the application’s login page. Well, the new cookie authentication middleware does that too.
Configuration
The new OWIN cookie authentication middleware is configured in App_Start/Startup.Auth.cs and consists of these lines of code:
public void ConfigureAuth(IAppBuilder app)
{
   app.UseCookieAuthentication(new CookieAuthenticationOptions
   {
      AuthenticationType = DefaultAuthenticationTypes.ApplicationCookie,
      LoginPath = new PathString("/Account/Login")
   });
}
This API call is configuring an identifier (or name) for this authentication middleware (AuthenticationType) and this is needed since there can be different authentication middleware. Also, this name influences the name of the cookie that will be used. The LoginPath is simply the URL to the login page when unauthorized requests need to be redirected.
Redirect to login
As mentioned above, the OWIN cookie middleware will redirect unauthorized requests to the login page. This is only performed if the LoginPath is set. If it’s not set, then this feature is disabled.
Login
On the login page once the user’s credentials have been validated, we can call into OWIN to authenticate the user. We don’t call the cookie middleware directly, instead we call into the “OWIN Authentication Manager”, which is an abstraction for all of the possible OWIN authentication middleware that’s being used. This call can be seen in the new templates and here’s the code if you wanted to invoke it yourself:
var claims = new List<Claim>();
claims.Add(new Claim(ClaimTypes.Name, "Brock"));
claims.Add(new Claim(ClaimTypes.Email, "brockallen@gmail.com"));
var id = new ClaimsIdentity(claims,
                            DefaultAuthenticationTypes.ApplicationCookie);

var ctx = Request.GetOwinContext();
var authenticationManager = ctx.Authentication;
authenticationManager.SignIn(id);
The above code creates the set of claims to represent the identity of the user and creates a ClaimsIdentity from the claims. Note the second parameter to the ClaimsIdentity constructor — this indicates the type of authentication. In the OWIN authentication middleware, this authentication type must match that of the middleware being targeted. So since this code is presumably trying to issue a cookie, then this value must be the same as the name we assigned to the cookie middleware from the ConfigureAuth initialization code from above.
Once the ClaimsIdentity is created, we then access the OwinContext which has the AuthenticationManager. We use its SignIn API passing the ClaimsIdentity. This then matches the authentication type to the corresponding authentication middleware and since we match the cookie authentication middleware, a cookie is issued that contains the claims of the ClaimsIdentity.
An additional option on the SignIn API is to pass a AuthenticationProperties object. This has an IsPersistent property that indicates if the cookie is to be persistent.
Visual Studio 2013 templates and ASP.NET Identity
The VS2013 templates use the new ASP.NET Identity system to obtain the claims for the user. In the templates you will see this being performed by the UserManager’s CreateIdentityAsync API. Additionally, the MVC and WebForms templates provide many helper methods that encapsulate accessing and calling into the authentication manager.
Protecting the cookie
As a side note, the contents of the cookie are protected as you’d expect (signed and encrypted). This protection is by default, which is good. There is yet another security setting, though, that requires attention: SSL. By default (presumably for simplicity and ease of development) the cookie is only issued with the secure flag (i.e. require SSL) if the incoming request is SSL. This is an important setting to change when you release your application to production. This setting is configured with an enum:
public enum CookieSecureOption
{
   SameAsRequest,
   Never,
   Always
}
and would be done with this configuration change (notice the CookieSecure flag):
public void ConfigureAuth(IAppBuilder app)
{
   app.UseCookieAuthentication(new CookieAuthenticationOptions
   {
      AuthenticationType = DefaultAuthenticationTypes.ApplicationCookie,
      LoginPath = new PathString("/Account/Login"),
      CookieSecure = CookieSecureOption.Always
   });
}
Other cookie configuration
There are two other settings of particular interest on the CookieAuthenticationOptions that might be familiar: ExpireTimeSpan and SlidingExpiration. The expiration allows the application to indicate how long the cookie is valid, and the sliding flag allows the expiration to be renewed as the user remains active within the application. The default for the expiration is 14 days and the default for the sliding flag is true.
Cookie authentication
So now that we have a cookie issued to the browser, upon subsequent requests the cookie will be sent and the cookie middleware must authenticate the request. The cookie middlware looks for the cookie name it issued (again from the name we assigned to the cookie middleware). If the cookie is absent, then it does nothing. If the cookie is present, then the cookie middleware reads and validates the cookie, and then if validated unpacks the claims contained therein and creates a ClaimsIdentity and sets this object into the OWIN context. Any downstream code could then use this OWIN API to determine the caller’s identity:
OwinContext ctx = Request.GetOwinContext();
ClaimsPrincipal user = ctx.Authentication.User;
IEnumerable<Claim> claims = user.Claims;
Of course, the ASP.NET APIs also work (Page.User, Controller.User) as well as the IIS host approaches (HttpContext.User, Thread.CurrentPrincipal and ClaimsPrincipal.Current).
Logout
Logging a user out is quite simple — there’s an API on the OWIN authentication manager called SignOut, which removes the cookie:
var ctx = Request.GetOwinContext();
var authenticationManager = ctx.Authentication;
authenticationManager.SignOut();
Fin
I hope this helps to understand the new OWIN cookie authentication middleware in .NET 4.5.1 and Visual Studio 2013.
MembershipReboot in IdentityServer
Many people have asked for a sample of integrating MembershipReboot into IdentityServer as the identity management library. I was finally galvanized to build a sample and so here it is. It supports all four main extensability points of IdentityServer that related to users, which are the IUserRepository, IUserManagementRepository, IClientCertificatesRepository, and IClaimsRepository interfaces, so you can login (with both passwords and client certificates) and then from the admin screen you can create/delete users, set password, add/remove roles, and add/remove client certificates. I feel bad this it took so long to build this sample (since it only took about an hour to code it from scratch and get it configured and tested in IdentityServer).
Enjoy.
IdentityServer support for disabling SSL for proxy server and load balancing scenarios
By default, IdentityServer requires SSL (for obvious reasons). But there are scenarios where IdentityServer might be deployed behind a load balancer or proxy server. In those situations it might be desirable to relax the SSL requirement in IdentityServer. I’m pleased to announce that this is now supported (with some configuration). You can read the details of the configuration from the docs.
Enjoy.
With Visual Studio 2013, Microsoft has provided a new “Change Authentication” wizard that is part of all ASP.NET projects. This includes an option for “Organizational Accounts”, which in essence means federation using the WS-Federation protocol. This wizard replaces the previous “Identity and Access Control” Visual Studio extension.
The unfortunate part of this is that the “Identity and Access Control” tool used to contain a test STS. This test STS ran locally and thus a full STS did not need to be installed and configured. It even had the ability to configure in a file the users and claims to issue, which was quite convenient for testing and checking into source control.
At Thinktecture we were saddened by the loss of such a useful tool, so we decided to open source a similar tool that we had built for one of our clients (with permission from and many thanks to that client).
From the docs:
EmbeddedSts is intended to be used from an ASP.NET application that is using .NET 4.5 and the Federated Authentication Module (FAM) from WIF. It allows for a simple and easy to use STS instead of a production STS that might require installation and configuration. It does this by embedding itself a proper WS-Federation security token service within the application itself. When the ASP.NET application would normally redirect to the production STS, it will instead redirect to the EmbeddedSts. The EmbeddedSts will provide a list of users that can login and will then issue a SAML token back to the application that contains the selcted user’s claims. This list of users and their associated claims is configurable in a JSON file (which can also be checked into your project, which is useful for testing).
It’s available on NuGet. The code is available on github. The docs are here.
Enjoy.
The good, the bad and the ugly of ASP.NET Identity
Ok, here we go again… and if you don’t know what I’m talking about, then see this post.
With Visual Studio 2013 and .NET 4.5.1 we have a new framework called ASP.NET Identity. ASP.NET Identity is yet another identity management framework from Microsoft (recall that we also had two prior frameworks from Microsoft: Membership and SimpleMembership). Let’s take a look at the good and the bad aspects of this new framework.
TLDR; Click here to get to the ugly conclusion.
One of the major complaints with the previous identity management frameworks was that it was either too cumbersome (with Membership) or too subtle (with SimpleMembership) to customize the storage. With this release, they’ve actually achieved a separation of the storage of the identity information (e.g. username, password, etc.) from the code that implements the security (e.g., password hashing, password validation, etc.). The way they’ve done this is by defining the account related data behind an interface, IUser and the storage operations behind another interface IUserStore. Here they are:
public interface IUser
{
   string Id { get; }
   string UserName { get; set; }
}

public interface IUserStore<TUser> : IDisposable where TUser : IUser
{
   Task CreateAsync(TUser user);
   Task DeleteAsync(TUser user);
   Task<TUser> FindByIdAsync(string userId);
   Task<TUser> FindByNameAsync(string userName);
   Task UpdateAsync(TUser user);
}
The idea is that you then implement these interfaces and this puts you in control of how the account data is actually stored. This also makes it easier for developers to customize the user account data. If you want more data associated with your user you can add it on your custom user class that implements this interface. This extra data would then be stored by your implementation of the IUserStore.
There are default implementations of these interfaces that use Entity Framework 6. When you choose “Individual User Accounts” in the new ASP.NET templates in Visual Studio 2013 you will get an IUser implementation in a class called ApplicationUser. Any custom data you’d want stored on your user accounts would be added to this class. Given EF’s support for POCOs, this extra data on the user account class will simply be mapped into the database with little effort on your part. See this post for an example.
For the class that implements IUserStore, there is a class from the ASP.NET Identity EF assembly called UserStore. It requires an EF DbContext, which is provided by another class generated in your project called ApplicationDbContext. There’s even less to code or customize on the ApplicationDbContext because its base already defined the DbSet for the user accounts (in its base class). The ApplicationDbContext class is primary there for you to control connection strings to indicate the database to actually use.
With this design it should be very straightforward and obvious for a developer using this framework what data is stored and how it is stored. In this sense, this new identity framework is a success and quells one of the long standing complaints about the previous membership systems.
Sidebar – Identity vs Authentication
Keep in mind that (as always) the provider model is simply about the storage and management of account related data. In a running application, once the user’s password has been validated (against the persisted password) then the user is logged into the application (typically) with some sort of cookie based mechanism like ASP.NET’s Forms authentication, WIF’s Session Authentication Module, or now in Visual Studio 2013 OWIN cookie middleware. Far too often the line between these two different subsystems (storage vs. authentication) is blurred. See this post for more context.
Another nice addition I should point out is that most (if not all) of the APIs in the new ASP.NET Identity system are asynchronous. This is a nice addition to the API, and almost assumed these days. I give kudos more to the EF team than anyone else since EF6 now supports asynchronous APIs.
So this new design segregates the storage of identity information from the rest of the security code. Well, what’s left? In theory it’s all the hard and complicated stuff related to identity management and the idea is that Microsoft will implement it for us. This is achieved via the UserManager class:
public class UserManager<TUser> : IDisposable where TUser : IUser
{
   public UserManager(IUserStore<TUser> store);

   public ClaimsIdentityFactory<TUser> ClaimsIdentityFactory { get; set; }
   public IPasswordHasher PasswordHasher { get; set; }
   public IIdentityValidator<string> PasswordValidator { get; set; }
   protected IUserStore<TUser> Store { get; }
   public virtual bool SupportsUserClaim { get; }
   public virtual bool SupportsUserLogin { get; }
   public virtual bool SupportsUserPassword { get; }
   public virtual bool SupportsUserRole { get; }
   public virtual bool SupportsUserSecurityStamp { get; }
   public IIdentityValidator<TUser> UserValidator { get; set; }

   public virtual Task<IdentityResult> AddClaimAsync(string userId, Claim claim);4
   public virtual Task<IdentityResult> AddLoginAsync(string userId, UserLoginInfo login);
   public virtual Task<IdentityResult> AddPasswordAsync(string userId, string password);
   public virtual Task<IdentityResult> AddToRoleAsync(string userId, string role);
   public virtual Task<IdentityResult> ChangePasswordAsync(string userId, string currentPassword, string newPassword);
   public virtual Task<IdentityResult> CreateAsync(TUser user);
   public virtual Task<IdentityResult> CreateAsync(TUser user, string password);
   public virtual Task<ClaimsIdentity> CreateIdentityAsync(TUser user, string authenticationType);
   public virtual Task<TUser> FindAsync(UserLoginInfo login);
   public virtual Task<TUser> FindAsync(string userName, string password);
   public virtual Task<TUser> FindByIdAsync(string userId);
   public virtual Task<TUser> FindByNameAsync(string userName);
   public virtual Task<Collections.Generic.IList<Claim>> GetClaimsAsync(string userId);
   public virtual Task<Collections.Generic.IList<UserLoginInfo>> GetLoginsAsync(string userId);
   public virtual Task<Collections.Generic.IList<string>> GetRolesAsync(string userId);
   public virtual Task<bool> HasPasswordAsync(string userId);
   public virtual Task<bool> IsInRoleAsync(string userId, string role);
   public virtual Task<IdentityResult> RemoveClaimAsync(string userId, Claim claim);
   public virtual Task<IdentityResult> RemoveFromRoleAsync(string userId, string role);
   public virtual Task<IdentityResult> RemoveLoginAsync(string userId, UserLoginInfo login);
   public virtual Task<IdentityResult> RemovePasswordAsync(string userId);
   public virtual Task<IdentityResult> UpdateAsync(TUser user);
   public virtual Task<IdentityResult> UpdateSecurityStampAsync(string userId);
}
Notice the constructor accepts the IUserStore. An application developer would instantiate the UserManger passing in their user store. The developer would then code to the UserManager’s APIs to do all of the account related functions, such as creating an account, validating a password, changing the password, etc. The APIs, as you can tell from the names, are fairly self-explanatory. This pattern is apparent in any of the new ASP.NET templates in Visual Studio 2013 when you choose “Individual user Accounts” for the authentication configuration.
Also, notice how most of the APIs are virtual; if the developer wishes to customize any of the built-in behavior then they would simply override the appropriate method. Hopefully the need for such a thing is rare.
One of the selling points about the new identity system is that it supports claims. Here’s an excerpt from the announcement:
“ASP.NET Identity supports claims-based authentication, where the user’s identity is represented as a set of claims.”
“Claims-based authentication” is a misnomer, and is akin to saying “role-based authentication”. I think what they mean is that the new identity system can model user identities with claims. They get around to that sentiment in the latter half of the sentence, but their terminology misuse confuses the point. For clarity, the new identity system uses password-based authentication (just like the prior systems). There’s also federation support, but, strictly speaking, it’s not a feature of the new ASP.NET Identity system.
Ok, back to claims: Notice on the IUser definition there are no claims (also notice that a Claim doesn’t appear anywhere in the code for the new ASP.NET templates in VS2013). Ok, so where are they? Well, I think Microsoft is still not confident enough in developers to understand how claims work so they made this piece optional. Depending on your perspective maybe this is good and maybe this is bad. I think it’s bad.
Anyway, to model claims there is another interface called IUserClaimsStore:
public interface IUserClaimStore<TUser> : IUserStore<TUser>, IDisposable where TUser : IUser
{
   Task AddClaimAsync(TUser user, Claim claim);
   Task<System.Collections.Generic.IList<Claim>> GetClaimsAsync(TUser user);
   Task RemoveClaimAsync(TUser user, Claim claim);
}
The approach here is that your user store would then also implement this API to be able to associate claims with the user account.
I find this approach distasteful. If you are building a custom user store, then you now have to implement an additional store interface to support claims. It’d be much easier and obvious if the user definition had a claims collection property.
Also, to confuse the situation, you now have two ways of modeling additional identity data on your user: one as custom properties on the user class and another as claims in the claims store. Which leads me to the next issue.
Bad: Once authenticated, custom user data is not in the ClaimsIdentity claims collection
As I mentioned above, a driving feature in the design of ASP.NET Identity was that it’s easy to store custom properties on the user. The only problem is that if they’re custom, then once the user logs into your application these properties won’t automatically be made available in the claims on the ClaimsIdentity (which is the standard class in .NET 4.5 for modeling an identity, is what represents the logged in user in any .NET application, and is what people mean when they say claims-aware). The reason that custom properties on your user class won’t be part of the ClaimsIdentity’s Claims collection is that the built-in code only knows about the IClaimsStore and not your custom properties.
This leads us to the next extensibility point, which is the ClaimsIdentityFactory on the UserManager. This is the class that maps the data on the user class to a ClaimsIdentity (presumably when the user logs in). If you need your custom properties to your user class as part of the ClaimsIdentity then you need to implement a custom ClaimsIdentityFactory to do this mapping.
This makes me wonder if it makes sense to add custom identity data to the user class and instead store it in the claims store. Also, this makes me wonder if it makes sense to add custom non-identity data to the user class at all and instead store it elsewhere in the database. I don’t know the right answer.
Bad: Wait, there’s also an IUserRoleStore?
Yep, to complicate things there’s also an interface to associate roles with users called IUserRoleStore:
public interface IUserRoleStore<TUser> : IUserStore<TUser>, IDisposable where TUser : IUser
{
   Task AddToRoleAsync(TUser user, string role);
   Task<System.Collections.Generic.IList<string>> GetRolesAsync(TUser user);
   Task<bool> IsInRoleAsync(TUser user, string role);
   Task RemoveFromRoleAsync(TUser user, string role);
}
This interface, like IUserClaimStore, is optional and if you want explicit role support you will need to implement this on your user store.
For those who are already familiar with claims, you know full well that claims are a superset of roles and this it’s unnecessary to treat roles special and separate from claims. That also make this IUserRoleStore interface superfluous. Microsoft knows this as well, but for some reason they continue to feel that there’s demand for roles separate from claims.
For what it’s worth, the previously mentioned ClaimsIdentityFactory will read from both the claim store and the role store and will map them both to the ClaimsIdentity Claim collection.
But this also leads to the potential (rather, likely) confusion as to where should a role be kept. Should you store roles in the claims store or in the role store? Well, you get to decide and ensure everyone else on your team knows the right answer, especially if you have your own code querying those stores directly.
Neutral (but actually Bad): Passwords are optional
Notice the lack of a password (or rather hashed password) on the user account? That’s right, passwords are optional. Just like the claims and role stores, there’s an optional store if your application needs to persist passwords (actually, hashed passwords) for the user called IUserPasswordStore:
public interface IUserPasswordStore<TUser> : IUserStore<TUser>, IDisposable where TUser : IUser
{
   Task<string> GetPasswordHashAsync(TUser user);
   Task<bool> HasPasswordAsync(TUser user);
   Task SetPasswordHashAsync(TUser user, string passwordHash);
}
So if you want your users to be able to use passwords to login then your user store must also implement this interface.
I’m on the fence about this – I can imagine scenarios where users would only login with an external identity provider and thus never have a local password. But if this is your scenario, I don’t see much point in the ASP.NET Identity system. You have innumerable ways to store data anyway you want to without tying yourself to the ASP.NET Identity system APIs.
So I guess this really is bad, because why else would you be using this API.
Good (but actually Bad): Password hashing is pluggable
I’ve been complaining for a long time that the default password hashing (PBKDF2) from Microsoft only performs 1000 iterations. With the UserManager API we can now plug in a custom implementation (via IPasswordHasher) and do more iterations as recommended by OWASP and this is good.
Unfortunately, this means you have to write security code and this is bad. I thought this was the whole point of using a security framework; someone else who supposedly knows what they’re doing is has already has done all the complex security work. This should have been implemented by Microsoft with an iteration count property instead.
The new ASP.NET Identity system allows you to map an external login provider to a local user account. This feature was introduced with SimpleMembership and is similarly available with this new framework. To store this info, though, there’s yet another store interface called IUserLoginStore which relies upon a class called UserLoginInfo which maintains the provider name and the identifier for the user:
public interface IUserLoginStore<TUser> : IUserStore<TUser>, IDisposable where TUser : IUser
{
   Task AddLoginAsync(TUser user, UserLoginInfo login);
   Task<TUser> FindAsync(UserLoginInfo login);
   Task<System.Collections.Generic.IList<UserLoginInfo>> GetLoginsAsync(TUser user);
   Task RemoveLoginAsync(TUser user, UserLoginInfo login);
}

public sealed class UserLoginInfo
{
   public UserLoginInfo(string loginProvider, string providerKey);

   public string LoginProvider { get; set; }
   public string ProviderKey { get; set; }
}
This is sounding like a broken record; if you want external login support, your user store must also implement this interface. Again, I feel like this additional interface is burdensome and it’d be simpler if the external logins were a collection on the user definition.
Notice there are no APIs for arbitrary queries. This means you’ll have to go around the interfaces to query your user data.
Bad: Back to leaky abstractions?
One of the complaints with the old membership system was the leaky abstractions. So many APIs might not be implemented and your application had to know which APIs it could and couldn’t invoke on the membership APIs. This meant you were forcing yourself to adhere to an interface contract without the benefit of the interface abstraction.
In the new system, I think it’s better designed, but it still feels like there’s a lot of leaky abstractions. You notice on the UserManager (beyond the simple user related APIs) there are APIs for managing claims, roles, passwords and external logins. These APIs only work if the user store implements the corresponding IUserClaimStore, IUserRoleStore, IUserPasswordStore, and IUserLoginStore. This seems like it’s the same problem as before, just in a different form.
I must admit, the story is slightly better with the new ASP.NET Identity; if an application wants to use these APIs, though, it can first query the UserManager and ask if it can use these APIs (via SupportsUserClaim, SupportsUserRole, SupportsUserPassword and SupportsUserLogin). Again this is better than before, but it still feels like a weak API design in that it’s trying to be too many things to too many people. If your application needs one of these features, it’s going to just use it. This then means any other user store you’d want to use must implement these same features.
It’d be much stronger of a design if the programming model had claims, passwords and external login support as properties on the user account class (and no roles*). If your application didn’t want to use them then it could ignore those APIs. This would simplify the design by eliminating all of these extra store interfaces and we’d be left with just the one user store. This design change would be better specifically for NoSql implementations (see below: Bad: Non-EF implementations).
* Specific support for roles is unnecessary given claims being a superset of roles, as previously mentioned. And if you really want a role specific API then just add an extension method that sits on top of the claims.
I suppose technically this design allows those aspects of the user to be stored separate from the user itself, but then this feels as if the framework is trying to be all things to all people. If I were designing a system where my user’s claims/roles needed to be loaded from a different system then I’d probably do that as a deliberate step in my authentication code (with something like a claims transformer, which is WIF’s pattern for modeling this type of operation).
Good: The default EF implementation does all of this for you
As mentioned earlier, there is a default implementation of the user store that uses EF 6. This implementation is called UserStore and it implements IUserStore, IUserLoginStore, IUserClaimStore, IUserRoleStore and IUserPasswordStore. This means it’s implementing all the store interfaces I droned on about earlier. This also means you are getting all of these features with little or no effort and the EF-specific implementation does many of the things I suggested: it defines claims, passwords, roles and external logins as part of the user class. I suppose my only complaint here is that roles are unnecessary (as previously mentioned). Of course if I don’t want the possibility of roles in my application, I’d have to go implement my own user store that omits the role store interface, but implements all of the other store interfaces.
One other minor issue is that the EF implementation of IUserStore, the API to delete a user throws a NotSupportedException. This stinks and harkens back to some of the leaky abstractions from the previous membership APIs.
Bad: Non-EF and/or custom implementations
I feel for those who are using NoSql or anything not with EF. The reason is that given the multiple interface design, your user store will be responsible for implementing all of the aforementioned store interfaces. As I previously mentioned, it would be much simpler if there were one user store with all the pertinent identity information stored on the user definition.
Aside (and probably Bad): I wonder if Azure (or Live) is using this framework?
As we evaluate frameworks and products from Microsoft, a useful metric on the quality and longevity is if Microsoft is using them internally. I suspect they’re not using the new ASP.NET Identity anywhere internally, thus there’s little mileage and internal feedback on it.
I wonder what Azure’s (or Live’s) identity management looks like and why Microsoft didn’t just use that instead for ASP.NET Identity. Now that I think about it, I’d also be curious what they use for their password hashing iterations. I digress.
Ugly: Where’s the hard and complicated security stuff?
As I see it, the reason for using a security framework (and in this case, an identity management framework) is because there’s some hard security stuff that you want to ensure has been done properly by a security professional. Looking over the UserManager API above, my question is “where’s all the security functionality?” I don’t know.
What sort of features am I talking about? Well, here’s a list:
- Email account verification : It’s not easy to ensure that a user is really in charge of an email account they claim to own.
- Password reset : What happens when a user forgets their password?
- Username reminder : What happens when a user forgets their username?
- Account lockout : What happens when an admin needs to lock an account?
- Password guessing prevention : How do you detect and prevent someone from attempting to brute force an account’s password?
- Close/Delete account : How do we handle an account that the user wants to close or delete? (right now the EF implementation throws a NotSupportedException… nice)
- Modern password storage (OWASP) : We should be able to ask the framework to do a better job of storing passwords.
- Mobile phone verification : It’s not easy to ensure that a user is really in charge of a mobile phone they claim to own.
- Two factor authentication : To improve security, we want the user to provide something they know and something they have to prove their identity.
- Certificate based authentication : How do we allow users to authenticate with certificates?
- Auditing : How do we audit changes to the user account information?
- Tracing : How do we debug failures in the identity management and authentication system?
This list of features is the hard part of building an identity management library. If you want any of the above features, then you get to implement them yourself. Many of these are non-trivial to implement and in doing so you will want to ensure you don’t open up any vulnerabilities in your application. G’d luck.
Also, with the previous membership frameworks we used to have support for: account lockout, password guessing prevention, and close/delete account semantics. So with this version, we’ve lost features.
This glass is half empty
Really the main bulk of code that Microsoft has provided for us in this new framework is the persistence code (via the EF-specific implementation). Unfortunately, the persistence is the easy part. What we really needed was a framework that solves the hard and complicated problems related to identity management.
As it stands now, these missing features in ASP.NET Identity make it unusable for all but the most trivial demo applications. It’s just not ready for prime time today. Of course, with this redesign, I think Microsoft is in a much better place to add these features in a future release. But it ain’t there now.
MembershipReboot
Given my frustrations with the previous provider APIs, I decided to build and open source my own identity management library called MembershipReboot. With this version of ASP.NET Identity, I really wanted it to be great so that there would no longer be a need for MembershipReboot, but I guess that didn’t happen. So if you’re looking for an alternative you can get it here.
Demos — Boston Code Camp 20
Demos and slides for my session on “Securing Web API” are here.
Links for topics I mentioned:
- Thinktecture AuthorizationServer (OAuth2 authorization server)
- Thinktecture IdentityModel (security helper library for applications)
- Thinktecture IdentityServer (identity provider)
- MembershipReboot (alternative library to membership)
- DevelopMentor (training)
- OWIN spec
- Katana (Microsoft’s OWIN libraries)
We had a good number of people for a security talk — thanks for coming!
Boston Code Camp 20
I’ll be speaking at Boston Code Camp 20 on October 19th, 2013 at the Microsoft New England Research & Development Center in Cambridge, MA. My talk is on Securing ASP.NET Web API Services.
Hope to see you there.
NDC London, December 2013
Looks like I’ll be speaking at NDC London in December, 2013. I have a pre-con that I’m doing with Dominick on “Claims-based Identity & Access Control” and then I have two sessions on Thursday: one on “Internals of Security in ASP.NET” and another on “Identity in ASP.NET”.
Hope to see you there!
MongoDB support in MembershipReboot
I sense a trend here…
The esteemed Jason Diamond was kind enough to contribute a MongoDB repository to MembershipReboot. The main sample now can be configured to run with either EF, RavenDB or MongoDB. All it takes it swapping out the repository in the DI container. See here to get started.
Many thanks, Jason!
RavenDB support in MembershipReboot
One of the design goals of MembershipReboot was to encapsulate all of the complex/hard security “stuff” for user account management and authentication, yet allow the persistence of user accounts (and related data) to be open and extensible. The default implementation in the samples uses EF, but to prove that MembershipReboot achieves its design goal there is now a working RavenDB repository implementation located here.
Many thanks to Chris Keenan for implementing the RavenDB code.
Client certificates and two factor authentication with client certificates in MembershipReboot
I just released v3.0.0 of MembershipReboot. It was a significant enough change to warrant going to 3.0. From my chicken scratch release notes:
Features added:
- separate EF code from the main library. there’s now a new library that contains the EF-specific persistence code.
- reworked the separation of the membership reboot configuration from the repository. this was necessary due to the EF library refactoring, plus it’s now cleaner.
- removed all the deprecated code and classes (mainly to eliminate confusion)
- added support for client certificates. client certificates can be used to either login or can be used as part of two factor authentication (in lieu of mobile sms two factor auth).
- added concept of groups (or group definitions). this doesn’t affect how roles (or groups) are associated with user accounts. rather it’s just a new entity/table where an application can define what groups the application uses. this was mainly added for scim support (http://www.simplecloud.info/).
- added account-level validation extensibility point. previously there were just username, email and password validators. now an application can register validators that are invoked for specific user account events. this is much like the existing notification events, except the validation events are called prior to the database being updated and are able to cancel the persistence. these validators are keyed off of the same user account event classes as notification.
- enhanced/improved diagnostic tracing in user account and user account service classes
- more user account events (#89) and some more built-in email notifications for these events
So some main points:
Previously there was only a single MembershipReboot library. It housed the core logic plus classes to persist the user account information via EntityFramework. Since MembershipReboot was designed to decouple the account management and security logic from the persistence, it made sense to also decouple the implementation this way. There are people using MembershipReboot with NoSql databases, so it now makes it a little easier on them now that the core library no longer has a dependency on EntityFramework.
Related to the prior point, I had to make some breaking changes in the MembershipRebootConfiguration. I wasn’t happy with the relationship between the configuration and the repository, and so I also decoupled those. This too is a breaking change, but I feel like it’s a cleaner design.
I apologize for these breaking changes, but they’re fairly simple to remedy. If you were previously using EF, then all you need to do is get the new MembershipReboot.Ef package from NuGet. If you were previously using the MembershipRebootConfiguration, you can remove the ctor argument that deals with instantiation of the repository. The repository is now a ctor parameter to the UserAccountService — in short this just means you need to include the repository in your DI framework (which you probably had anyway). See the updated samples too see how it’s done.
So in addition to those structural changes, I added support for client certificates. Client certificates can be associated with a user account and used for either full authentication (in lieu of username/password) or they can be used for two factor authentication (username/password in addition to client certificate). So now this means the two factor authentication support in MembershipReboot can be either mobile SMS code (like google does) or client certificates. BTW, this is an account-by-account setting. Again, see the updated samples too see how it’s done.
Beyond these major additions, there were several other smaller tweaks here and there. All in all, I’m really happy how this library is progressing.
As always, questions, feedback, and enhancement requests are all welcome.
OWIN Authentication Middleware Architecture
In Katana (Microsoft’s OWIN framework and host implementation) there is an abstraction for creating middleware that does authentication. Microsoft has defined base class called AuthenticationMiddleware and AuthenticationHandler (among other helper classes) and these work to process requests to establish the identity of the user. Microsoft has also defined several derived classes that implement various authentication schemes, such as Basic authentication, cookie-based (comparable to forms authentication in ASP.NET), and external authentication mechanisms (like google, facebook, microsoft accounts, etc.).
The processing model for authentication middleware is as such. In the application’s startup configuration authentication middleware would be registered (much like any other middleware). The AuthenticationMiddleware base class provides the implementation of Invoke (the required middleware “interface”), and the derived implementation overrides CreateHandler to return a new instance of an AuthenticationHandler. The authentication handler is created per-request and it then overrides various base class methods depending on the nature of the authentication being performed. The four main methods (with their purpose) are:
AuthenticateCoreAsync: This is used to look for incoming tokens on the request and convert them into an AuthenticationTicket (which is a container for the caller’s identity). This returns null if there is no token or the token is invalid. This is invoked during pre-processing in the OWIN pipeline if the authentication middleware is considered “active”. When marked as “passive” then it’s invoked only when it’s needed (typically by the application layer).
InvokeAsync: This is invoked during pre-processing in the OWIN pipeline. The purpose of this method is to determine if the incoming request is an authentication callback of some sort (like an OAuth callback, for example). If this is a callback request, the implementation should process the request, log the user in (via some other middleware like the cookie based middleware), issue a redirect, and then return true indicating that no other middleware should be invoked (thus short-circuiting the middleware pipeline). If the request is not a callback, then simply return false and the rest of the pipeline is executed.
ApplyResponseGrantAsync: This is invoked during post-processing in the OWIN pipeline. It is used to modify the response if needed to either issue a token or clear a token. This will only be appropriate if earlier in the OWIN pipeline the client had provided credentials in some way or requested to sign-out.
ApplyResponseChallengeAsync: This is invoked during post-processing in the OWIN pipeline. The purpose is to issue a challenge back to the caller if the application has issued a 401 (unauthorized). For some authentication protocols this means a “WWW-Authenticate” response header, but for other protocols this means issuing a 302 redirect.
Not all of these methods make sense for all types of authentication. This is the breakdown for the built-in authentication middleware:

The pattern I see here is that there are two styles: local token processing and external authentication. It feels a bit cumbersome to have both of these styles mixed into a single base class with such mixed semantics. Oh well.
If you need to build your own authentication middleware then it can be confusing which methods you need to implement (from the AuthenticationHandler base class). Hopefully this breakdown helps inform any custom implementation you need to build (such as Basic, WS-Federation, SAML2-P, OpenID Connect or any others that aren’t provided by Katana).
As a side note, Thinktecture IdentityModel has a proper Hawk implementation as mentioned here.
HTH
Two factor authentication support in MembershipReboot
In MembershipReboot, I just checked in support for two factor authentication (via mobile phone SMS messages). This also means that there’s now specific support for associating a mobile phone number with a user account. Turns out this is just as tricky to verify as validating that a user owns an email account.
In any event, a user can now associate a mobile phone with their account, safely change the mobile number associated with their account and then based upon this enable their account for two factor authentication. I updated the SingleTenantWebApp sample to illustrate usage (and even implemented Twilio as the back-end SMS provider).
I’m quite happy I was able to get this feature in. Feedback welcome.
Edit: I spent the rest of the day adding one more related feature: Optional browser registration. This means that the first time you use a specific browser to authenticate you will need to do two factor authentication, but subsequent authentication from the “registered” browser will not need the two factor auth code. The default implementation of this policy will remember the browser “registration” for 30 days and will automatically revoke all registrations if the password is changed. The intent of this feature was to behave like google’s two factor auth where once you’ve logged in with a browser you don’t need to keep entering a code from your SMS. It’s an optional tradeoff between security and usability/convenience. Enjoy.
Announcing MembershipReboot
It’s sort of silly that I’m doing an announcement now since MembershipReboot is at version 2.1 (my first release was in January, 2013), but since I never made a formal post on it, this will have to suffice.
It’s no secret I’ve been a harsh critic of the ASP.NET membership system (since ~2005 when it was first released) and have never been able to use membership on any real projects (either due to requirements of the project where membership didn’t match or the design of membership being was too leaky of an abstraction). Since I’ve been building these sorts of libraries over and over for many years now, I finally decided to write a more formal library and open source it for others to use (and contribute to). From the readme:
MembershipReboot is a user identity management and authentication library. It has nothing to do with the ASP.NET Membership Provider, but was inspired by it due to frustrations with the built-in ASP.NET Membership system. The goals are to improve upon and provide missing features from ASP.NET Membership. It is designed to encapsulate the important security logic while leaving most of the other aspects of account management either configurable or extensible for application developers to customize as needed.
Some of the features of MembershipReboot are:
- single- or multi-tenant account management
- flexible account storage design (relational/SQL or object/NoSql)
- claims-aware user identities
- support for account registration, email verification, password reset, etc.
- account lockout for multiple failed login attempts (password guessing)
- extensible templating for email notifications
- customizable username, password and email validation
- notification system for account activity and updates (e.g. for auditing)
- account linking with external identity providers (enterprise or social)
- proper password storage (via PBKDF2)
- configurable iterations
- defaults to OWASP recommendations for iterations (e.g. 64K in year 2012)
- Two factor authentication support via mobile phone SMS messages
The most common use case will be to integrate this into an ASP.NET or ASP.NET MVC application, though the library can also be used over a network as a service.
This most recent release (v2.1) had a bit of internal refactoring and now I’m quite happy with the architecture. It’s quite flexible and can accommodate most (if not all) enterprise-level requirements for user account management. I think one of the important features of MembershipReboot (as stated above) is that it was designed to encapsulate the important security logic, while leaving most of the other aspects of account management extensible for application developers to customize as needed. In other words, MembershipReboot does all the proper password hashing, authentication logic and other important security stuff, but if you want to change how the data is stored or how emails look when they are sent, that’s all open to customization. This lack of this separation was one of my biggest complaints about the ASP.NET membership system — it didn’t do the hard parts and allow you to extend the simple parts. MembershipReboot does.
The code is available on github (as well as a few samples to you can see how to use and extend the API). Feel free to provide feedback, questions, and enhancement requests on the issue tracker. It’s also available on NuGet.
Enjoy.
Dominick and I have been working hard at implementing OpenID Connect in Thinktecture IdentityServer. Dominick has recently completed the authorization server and user profile endpoint bits. We also just recently completed a sample for a basic profile client (meaning server-side web application, or code flow client).
Our approach was to provide a very simple library to allow a client application to authenticate users without knowing all the protocol details. We built a http module (inspired by WIF’s FAM) that will implement all the necessary protocol details and once the user’s identity is established we then use the SAM to log the user into the application. To use the library all the client application needs to do is register the OpenIdConnectAuthenticationModule http module (as well as the SAM) and provide some configuration settings. Here are the steps:
In web.config, register the http modules:
<system.webServer>
   <modules>
      <add name="SessionAuthenticationModule"
           type="System.IdentityModel.Services.SessionAuthenticationModule, System.IdentityModel.Services, Version=4.0.0.0, Culture=neutral, PublicKeyToken=b77a5c561934e089" />
      <add name="OpenIdConnectAuthenticationModule"
           type="Thinktecture.IdentityModel.Oidc.OpenIdConnectAuthenticationModule" />
   </modules>
</system.webServer>
Then configure the OpenIdConnectAuthenticationModule, either via a web.config entry:
<configSections>
   <section name="oidcClient"
            type="Thinktecture.IdentityModel.Oidc.OidcClientConfigurationSection, Thinktecture.IdentityModel.Oidc" />
</configSections>

<oidcClient clientId="oidccode"
            clientSecret="secret"
            scope="profile offline_access"
            issuerName="http://identityserver.v2.thinktecture.com/samples"
            signingCertificate="CN=idsrv.local"
            appRelativeCallbackUrl="~/oidccallback"
            callUserInfoEndpoint="true"
            authorizeErrorRedirectUrl="~/Home/OidcError"
>
   <endpoints authorize="https://idsrv.local/issue/oidc/authorize"
              token="https://idsrv.local/issue/oidc/token"
              userInfo="https://idsrv.local/issue/oidc/userinfo" />
</oidcClient>
Or in code in global.asax (or a combination of the two):
protected void Application_Start()
{
   OidcClientConfigurationSection.Instance.ClientId = "MyClientId";
   OidcClientConfigurationSection.Instance.ClientId = "MySecret";
}
The settings needed are:
ClientID: Client application’s identifier as configured in the OpenID Connect Authorization Server.
Client Secret: Client application’s secret as configured in the OpenID Connect Authorization Server.
Scope: Whitespace delimited list of OpenID Connect scopes being requested.
Issuer Name: Identifier of the OpenID Connect Authorization Server identifier.
Signing Certificate: Certificate subject distinguished name used to lookup the signing certificate in the “Trusted People” machine certificate store.
App Relative Callback Url (optional): Application relative URL for the OpenID Connect callback. Defaults to “~/oidccallback”. Change if you prefer a different URL.
Call UserInfo Endpoint (optional): Flag indicates if the client app needs the user profile identity information. Use “false’ if only the “sub” claim is needed. Defaults to “true”.
Authorize Error Redirect Url (optional): Application relative URL to show to the user when there is an authorization error from the OpenID Connect Authorization Server.
Authorize Endpoint: Authorization URL as provided by the OpenID Connect Authorization Server.
Token Endpoint: Token URL as provided by the OpenID Connect Authorization Server.
User Info Endpoint: User Profile URL as provided by the OpenID Connect Authorization Server.
The OpenIdConnectAuthenticationModule does two things:
1) It looks for 401 (unauthorized) http status codes from the application and initiates the OpenID Connect protocol by redirecting to the Authorization Server’s authorize endpoint.
2) It waits for the OpenID Connect Authorization Server to then call back into the callback URL to provide the client application with the authorization response. The OpenIdConnectAuthenticationModule will then continue with the rest of the OpenID Connect protocol (which involves calling back to the user info endpoint). Ultimately once the protocol completes the OpenIdConnectAuthenticationModule uses the SAM to issue a session token. Upon the next request into the application the user identity will be accessible via ClaimsPrincipal.Current.
The last bit of extensibility is that the OpenIdConnectAuthenticationModule raises events as it’s doing its processing. You can handle them in global.asax as such:
void OpenIdConnectAuthenticationModule_AuthorizeResponse(object sender, AuthorizeResponseEventArgs args)
{
   if (args.Response.IsError)
   {
      args.Cancel = true;
      args.RedirectUrl = "~/error";
   }
}
void OpenIdConnectAuthenticationModule_TokenResponse(object sender, TokenResponseEventArgs args)
{
}
void OpenIdConnectAuthenticationModule_IdentityTokenValidated(object sender, IdentityTokenValidatedEventArgs args)
{
}
void OpenIdConnectAuthenticationModule_UserInfoClaimsReceived(object sender, UserInfoClaimsReceivedEventArgs args)
{
}
void OpenIdConnectAuthenticationModule_SessionSecurityTokenCreated(object sender, SessionTokenCreatedEventArgs args)
{
}
void OpenIdConnectAuthenticationModule_SignedIn(object sender, EventArgs args)
{
}
void OpenIdConnectAuthenticationModule_Error(object sender, ErrorEventArgs args)
{
}
The events raised by the OpenIdConnectAuthenticationModule are:
AuthorizeResponse: Called when the authorize endpoint in the client application is called by the Authorization Server. The OidcAuthorizeResponse is passed in as a property of the event args and indicates the outcome of authorization.
TokenResponse: Called after the token endpoint is invoked. The OidcTokenResponse is passed in as a property of the event args.
IdentityTokenValidated: Called after the identity token in the OidcTokenResponse is validated. The claims from the identity token are passed in as a property of the event args.
UserInfoClaimsReceived: Called after the user profile endpoint is invoked. The claims from the user profile response are passed in as a property of the event args.
SessionSecurityTokenCreated: Called after the SAM SessionSecurityToken is created from the user’s claims.
SignedIn: Called after the SAM SessionSecurityToken is written out as a cookie.
Error: Only invoked if there is an unexpected exception during the processing in the OpenIdConnectAuthenticationModule.
Many of the event args passed to the event handlers also contain Cancel and RedirectUrl properties. Cancel allows the event handler to force the OpenIdConnectAuthenticationModule to stop processing and the RedirectUrl is the URL the user is then redirected to.
As of now, the OpenIdConnectAuthenticationModule is a sample on github. We are seeking feedback on features and improvements. Once it’s got some more mileage, we plan to incorporate the OpenIdConnectAuthenticationModule into IdentityModel.
Most people familiar with ASP.NET’s HTTP modules are used to implementing the synchronous pipeline APIs (events such as BeginRequest, AuthenticateRequest, EndRequest, etc.). Far fewer people are aware that there are also asynchronous versions of these events that an author of an HTTP module can implement. These async APIs are useful when your interception code in the module needs to perform some sort of I/O bound work. This allows your HTTP module to relinquish its thread while waiting on the results of the I/O bound work. The end result is that you don’t waste threads in the ASP.NET thread pool by blocking.
An example of one of these APIs is AddOnBeginRequestAsync. This accepts two callbacks (a “Begin” and a “End”) and follows the .NET v1.1 APM (asynchronous programming model) style for asynchronous work. It looks like this:
public void AddOnBeginRequestAsync(
    BeginEventHandler bh,
    EndEventHandler eh
)
The BeginEventHandler would return the APM-style IAyncResult.Here’s the start of a HTTP module that implements this:
public class MyModule : IHttpModule
{
   public void Dispose()
   {
   }

   public void Init(HttpApplication app)
   {
      app.AddOnBeginRequestAsync(OnBegin, OnEnd);
   }

   private IAsyncResult OnBegin(object sender, EventArgs e, AsyncCallback cb, object extraData)
   {
      ...
   }

   private void OnEnd(IAsyncResult ar)
   {
      ...
   }
}
If the underlying APIs you use to implement OnBegin function are also APM style, then you can just return their IAyncResult return values, as such:
WebRequest req;
private IAsyncResult OnBegin(object sender, EventArgs e, AsyncCallback cb, object extraData)
{
   req = System.Net.HttpWebRequest.Create("http://foo.com");
   return req.BeginGetResponse(cb, extraData);
}

private void OnEnd(IAsyncResult ar)
{
   var resp = req.EndGetResponse(ar);
   // use resp here...
}
But given that the modern API for modeling asynchronous operations is the Task, then it’s possible you’d want to use a Task-based API and the new async/await features in C# to implement your I/O bound work. How can we bridge these two programming models? Fortunately, it’s pretty boilerplate:
private IAsyncResult OnBegin(object sender, EventArgs e, AsyncCallback cb, object extraData)
{
   var tcs = new TaskCompletionSource<object>(extraData);
   DoAsyncWork(HttpContext.Current).ContinueWith(t =>
   {
      if (t.IsFaulted)
      {
         tcs.SetException(t.Exception.InnerExceptions);
      }
      else
      {
         tcs.SetResult(null);
      }
      if (cb != null) cb(tcs.Task);
   });
   return tcs.Task;
}

private void OnEnd(IAsyncResult ar)
{
   Task t = (Task)ar;
   t.Wait();
}

async Task DoAsyncWork(HttpContext ctx)
{
   var client = new HttpClient();
   var result = await client.GetStringAsync("http://foo.com");
   // use result
}
The real async work we want to do is in DoAsyncWork and it can take advantage of async/await and any other Task-based API. The rest of the code is the boilerplate code (inside of OnBegin and OnEnd).
For the return value of OnBegin we don’t want to implement IAsyncResult ourselves, so we leverage the fact that Task class already does so. We use TaskCompleationSource to obtain a Task because it 1) allows us to set the extraData on the Task that implements the IAsyncResult, and 2) it gives us a reference to the Task to pass when we need to invoke the callback. Our return value from OnBegin is the IAsyncResult as implemented by the Task in our TaskCompletionSource.
As you can see from the code, we invoke the actual async work and use a continuation to handle the outcome. In the continuation we check if the work had an exception or not. If so, we set the TaskCompleationSource into an exception state, otherwise we set it into a completed state (by passing null). We then need to invoke the callback (as per the APM style) to let ASP.NET know the work is done as we pass the same IAsyncResult instance that we returned from OnBegin (this is a subtle point and is why we don’t use async/await on the OnBegin itself).
OnEnd is also boilerplate. We need to block if the async work is not complete, so we downcast the IAsyncResult to our Task and call Wait. This also has the nice side-effect of re-throwing any exception that occurred (as set by SetException in the continuation described above).
The above code shows how to write the boilerplate code and is what you’d have to do if you’re still in .NET 4.0. There’s another easier approach if you’re in .NET 4.5. You can use the the EventHandlerTaskAsyncHelper class and it wraps up the boilerplate code for you (but requires your async method to accept an event-style set of params):
public void Init(HttpApplication app)
{
   var wrapper = new EventHandlerTaskAsyncHelper(DoAsyncWork);
   app.AddOnBeginRequestAsync(wrapper.BeginEventHandler, wrapper.EndEventHandler);
}

async Task DoAsyncWork(object sender, EventArgs e)
{
   var app = (HttpApplication)sender;
   var ctx = app.Context;

   var client = new HttpClient();
   var result = await client.GetStringAsync("http://foo.com");
   // use result
}
Hopefully with this boilerplate code you will have an easy time if you ever need if you ever need to implement an async HTTP module.
Dominick is a machine!
The mid term plan is that OpenID Connect will replace the plain OAuth2 endpoints in IdentityServer. As a first step, I just checked in a preview of the OIDC basic client profile support (see this doc).
The preview consists of two parts:
- OIDC authorize/token/userinfo endpoints for IdSrv
- ASP.NET client module
To enable the above endpoints, simply uncomment the OIDC routes in ProtocolConfig.cs.
To register an OIDC client, create an OAuth2 code flow client for now:

And adjust the settings in the sample client project web.config accordingly:
The OIDC client module will then automatically redirect to the OpenID provider and coordinate the front/back channel work.
Have fun!

